
Streaming is a method of how data is being sent and processed. While there are plenty of modules that do the heavy work, like express, body-parser and formidable, you might be curious about how do their job under the cover.
Table of contents
TL:DR - Skip the theory - Take me to the code
Prerequisites
To follow along, you'll need:
What are streams for Node.js?
Streams are a very basic method of data transmission. They divide your data into smaller chunks and transfer (pipe) them, one by one, from one place to another. Whenever you're watching a video on Netflix, you're experiencing them first hand - not the whole video is initially sent to your browser, but only the parts of it you're watching.
A lot of npm and native node modules are using streams under the hood, as they come with a few neat features:
- Asynchronously sending requests and responses
- Reading data from - and writing data to one another - physical location
- Processing data without putting them into memory
The processing part makes streams particularly charming. It makes dealing with bigger files more efficient. You could say they power the spirit of Node's event loop unblocking i/o magic.
To visualize streams, consider the following example.
- You have a single file with a size of 4 GB
- To process it, your computer must load it into memory
- That's quite a boulder to digest all at once
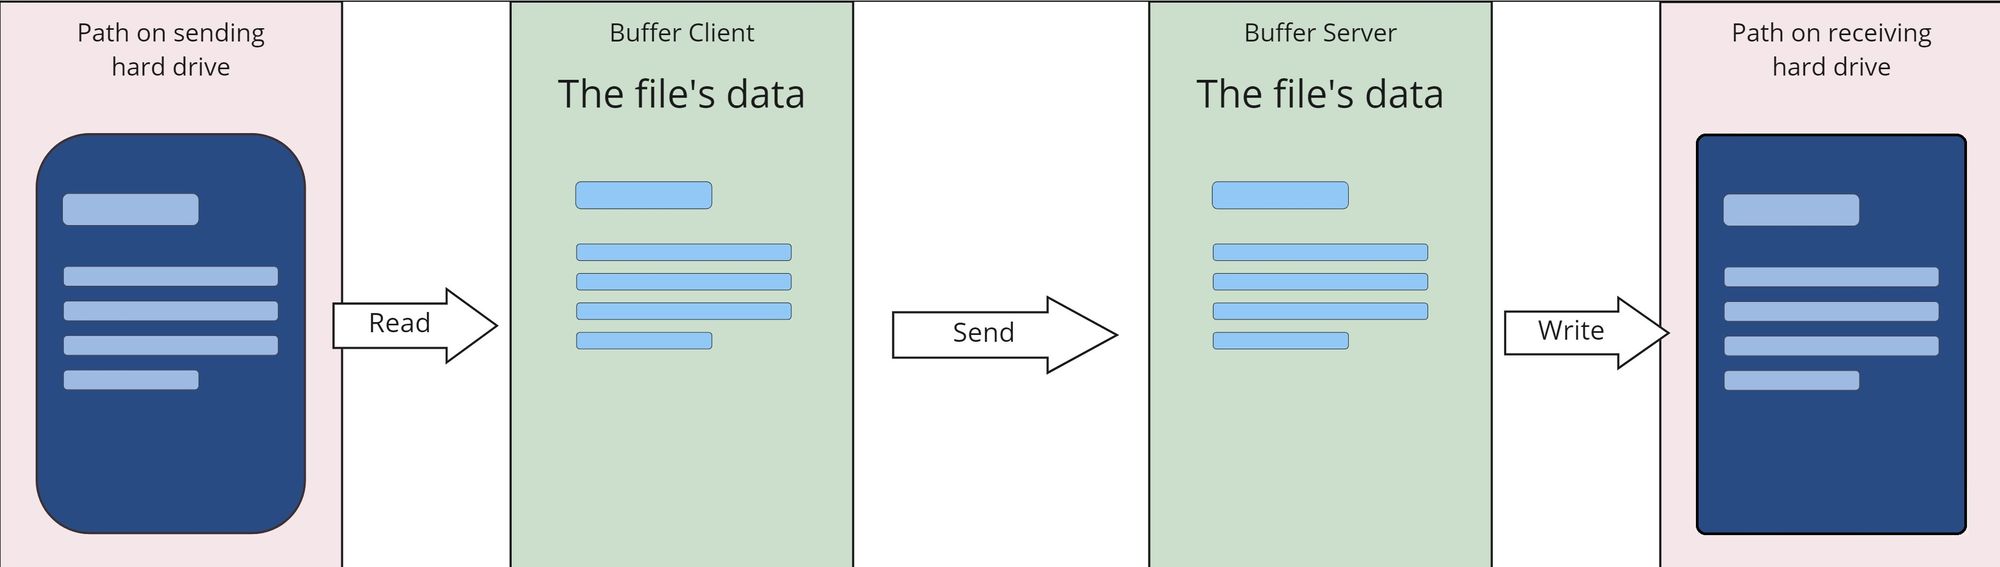
Streams, in comparison to the example above, would not read/write the file as a whole, but rather split it into smaller chunks. These can then be sent, consumed, or worked through incrementally, effectively lowering stress for the hardware. That's exactly what we'll build now.

In a nutshell, streams splits a computer resource into smaller pieces, working through these one by one, instead of processing it as a whole.
Get started
... or skip to the full example right away
Let's formulate the features we'll want to have:
- A one-file express server.
- A route that reacts to POST - requests
- A function that handles the streaming part
- A directory to which the file can be uploaded. We'll simply use the root directory
- A progress indicator to visualize the streaming progress while the file is uploading.
Then bootstrap your project with these simple steps:
- Open up your favorite text editor and create a new folder.
- Initialize an npm project and install the necessary modules.
- Add an index.js file, which we'll populate with our code in a moment.
# Initialize the project
$ npm init -y

# Install the express module
$ npm i express

# Optionally add nodemon as dev dependency
$ npm i -D nodemon

# Create the index.js file
# $ New-Item index.js (Windows Powershell)
$ touch index.js (Linux Terminal)
You should now have a folder structure that looks like this:
project-directory
| - node_modules
| - package.json
| - index.js
Create the server
Add the following to your index.js file to a simple express server:
// Load the necessary modules and define a port
const app = require('express')();
const fs = require('fs');
const path = require('path');
const port = process.env.PORT || 3000;

// Add a basic route to check if server's up
app.get('/', (req, res) => {
  res.status(200).send(`Server up and running`);
});

// Mount the app to a port
app.listen(port, () => {
  console.log('Server running at http://127.0.0.1:3000/');
});
Open the project directory in a terminal/shell and start the server up.
# If you're using nodemon, go with this
# in the package.json:
# { ...
#   "scripts": {
#     "dev": "nodemon index.js"
#   }
# ... }

# Then, run the dev - script
npm run dev

# Else, start it up with the node command
node index.js
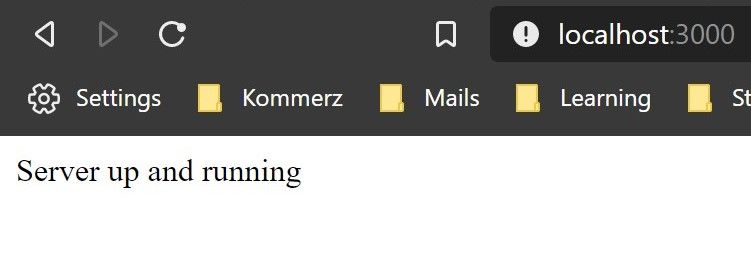
Launch a browser & navigate to http://localhost:3000. You should see this response:
Writing a basic stream to save data to a file
There are two types of streaming methods - one for reading, and one for writing. Let's start with a simple example. Below, you'll find two variables that represent streams. Each of them has a designated resource they read from or write to. This can either be a physical path on your hard drive, a memory buffer, or a URL.
const fs = require("fs");

const readStream = fs.createReadStream(whereFrom)
const writeStream = fs.createWriteStream(whereTo)

// You could achieve the same with destructuring:
const {createReadStream, createWriteStream} = require("fs");
After being created and till it closes, streams emit a series of events that we can use to hook up callback functions. One of these events is 'open', which fires right after the stream is instantiated.
Add the following below the app.get() method in the index.js - file
app.post('/', (req, res) => {
  const filePath = path.join(__dirname, `/image.jpg`);
  const stream = fs.createWriteStream(filePath);

  stream.on('open', () => req.pipe(stream););
});
What I found particular interesting about this one is:
Why the heck does the request have a pipe method?
The answer is noted in the HTTP - module documentation which express builds on - a request itself is an object that inherits from the parent 'Stream' class, therefore has all its methods available.
Having added the stream, let us now reload the server, move to Postman, and do the following:
- Change the request method to POST and add the URL
localhost:3000 - Select the 'Body' tab, check the binary option, and choose a file you would like to upload. As we've hardcoded the name to be 'image.jpg', an actual image would be preferable
- Hit 'Send' and check back to the code editor.
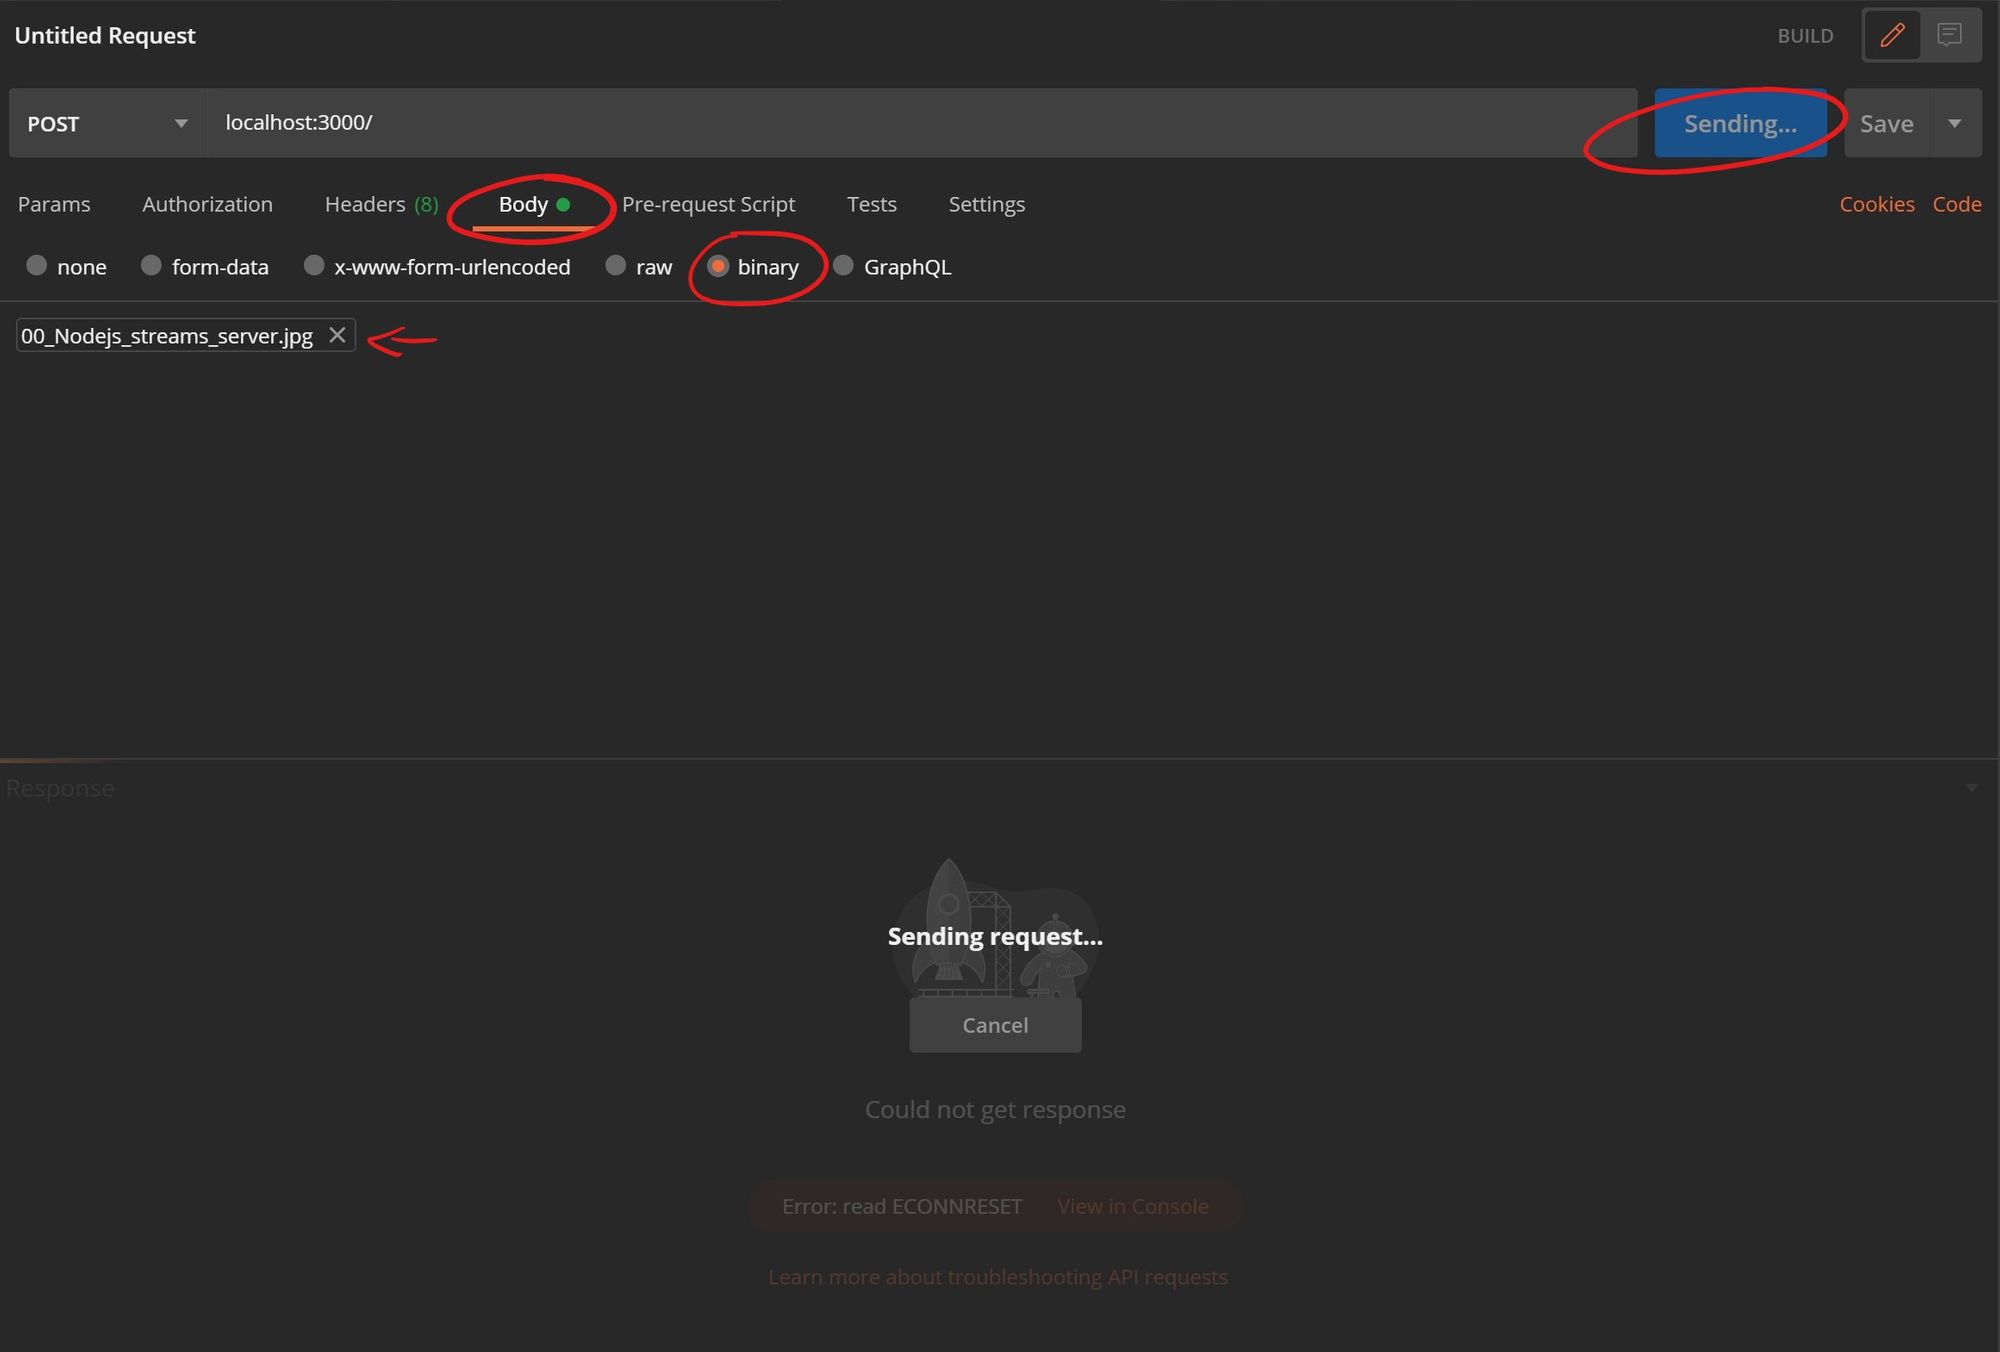
If everything went well, you'll notice the file you just chose is now available in the project's root directory. Try to open it and check if the streaming went successfully.
If that was the functionality you were looking for, you could stop reading here. If you're curious to see what else a stream has in stock, read ahead.
Use stream -events and -methods
Streams, after being created, emit events. In the code above, we're using the 'open' - event to only pipe data from the request to its destination after the stream is opened. These events work very similarly to the ones you know from the app.use() method. and make use of Node's event loop. Let's now take a look at some of these which can be used to control the code flow
Event 'open'
As soon as the stream is declared and starts its job, it fires the open event. That is the perfect opportunity to start processing data, just as we've done previously.
Event 'drain'
Whenever a data chunk is being processed, it's 'drained' to/from somewhere. You can use this event to e.g. monitor how many bytes have been streamed.
Event 'close'
After all, data has been sent, the stream closes. A simple use case for 'close' is to notify a calling function that the file has been completely processed and can be considered available for further operations.
Event 'error'
If things go sideways, the error event can be used to perform an action to catch exceptions.
Let us now integrate the three new events with some basic features. Add the following to your main.js file, below the closing of the 'open' event:
stream.on('drain', () => {
 // Calculate how much data has been piped yet
 const written = parseInt(stream.bytesWritten);
 const total = parseInt(headers['content-length']);
 const pWritten = (written / total * 100).toFixed(2)
 console.log(`Processing  ...  ${pWritten}% done`);
});

stream.on('close', () => {
 // Send a success response back to the client
 const msg = `Data uploaded to ${filePath}`;
 console.log('Processing  ...  100%');
 console.log(msg);
 res.status(200).send({ status: 'success', msg });
});

stream.on('error', err => {
 // Send an error message to the client
 console.error(err);
 res.status(500).send({ status: 'error', err });
});
Wrap up & modularization
Since you probably would not drop your functions right into a .post() callback, let's go ahead and create its own function to wrap this article up. I'll spare you the details, you can find the finalized code below.
Also, if you skipped from above, the following is happening here:
- The code below creates an express server that handles incoming post requests.
- When a client sends a file stream to the route, its contents are uploaded.
- During the upload, four events are fired.
- In these, functions are called to process the file's content and provide basic feedback on the upload progress.
Now it's your turn. How about building a user interface that takes over the job of sending a file to the root path? To make it more interesting, try using the browser's Filereader API and send the file asynchronously, instead of using a form. Or use a module like Sharp to process an image before streaming it back to the client.
PS: In case you try the former method, make sure to send the file as an ArrayBuffer
// Load the necessary modules and define a port
const app = require('express')();
const fs = require('fs');
const path = require('path');
const port = process.env.PORT || 3000;

// Take in the request & filepath, stream the file to the filePath
const uploadFile = (req, filePath) => {
 return new Promise((resolve, reject) => {
  const stream = fs.createWriteStream(filePath);
  // With the open - event, data will start being written
  // from the request to the stream's destination path
  stream.on('open', () => {
   console.log('Stream open ...  0.00%');
   req.pipe(stream);
  });

  // Drain is fired whenever a data chunk is written.
  // When that happens, print how much data has been written yet.
  stream.on('drain', () => {
   const written = parseInt(stream.bytesWritten);
   const total = parseInt(req.headers['content-length']);
   const pWritten = ((written / total) * 100).toFixed(2);
   console.log(`Processing  ...  ${pWritten}% done`);
  });

  // When the stream is finished, print a final message
  // Also, resolve the location of the file to calling function
  stream.on('close', () => {
   console.log('Processing  ...  100%');
   resolve(filePath);
  });
   // If something goes wrong, reject the primise
  stream.on('error', err => {
   console.error(err);
   reject(err);
  });
 });
};

// Add a basic get - route to check if server's up
app.get('/', (req, res) => {
 res.status(200).send(`Server up and running`);
});

// Add a route to accept incoming post requests for the fileupload.
// Also, attach two callback functions to handle the response.
app.post('/', (req, res) => {
 const filePath = path.join(__dirname, `/image.jpg`);
 uploadFile(req, filePath)
  .then(path => res.send({ status: 'success', path }))
  .catch(err => res.send({ status: 'error', err }));
});

// Mount the app to a port
app.listen(port, () => {
 console.log('Server running at http://127.0.0.1:3000/');
});
