
This article explains a few techniques that make use of express's middleware interface. You will learn how to set up a common logger, add CORS and cache HTTP headers, as well as implement simple Basic Authentication into your Node application.
Table of contents
Middleware is commonly used to enhance or extend the functionality of the main application. For the time the client-server communication takes place, it has access to both the request and the response object. And while there's already a lot of node modules that provide neat features, you might want to give your app a more customizable edge.
Note that I will assume you have a basic understanding of how express and HTTP works. If you need a refresher, visit the MDN docs for an HTTP-Overview and HTTP-Methods. You can then use a tool like Postman to communicate with the respective express endpoints.
If you prefer the TL: DR options, you can find the source code to this article on Github
The project setup
Let's start by setting up a basic outline.
If you do not have it installed already, get yourself a copy of Node.js.
Then, change into a directory of your choice and set up the project structure below. Make sure to also install express.js as a dependency.
# /
# | - middleware
# |   | - index.js
# | - index.js
# | - package.json

# Quickly set it up with the following shell command:
npm init -y
npm i -D express
mkdir middleware routes
touch routes/user.js index.js
Then, add the following code to the index.js file:
const express = require('express')
const app = express()
const port = 3000

app.get('/', (req, res) => {
  res.status(200).send(`<h1>Hello from ${req.hostname}</h1>`)
});

app.listen(port, () => {
  console.log(`Example app listening on port ${port}!`)
});
Launch the application by typing node index.js in your terminal. This will start a simple webserver to get started with.
Using middleware functions
Middleware can be put to use in two different ways:
- Application-wide with the pattern
app.use(middleware); - Route-specific with the pattern
app.use('/path', middleware);, wherepathis the pattern of the route middleware should be applied to.
It is also possible to replace app with router in a dedicated file, as well as replace use with HTTP methods such as .get.
Let's now end the skirmish and take a look into some appliances.
1: Write access and error logs
A simple but effective use case is to put in a central logger. To do so, create a new file in your project under middleware/index.js and add the following code:
function accessLog(req, res, next) {
  const { hostname, method, path, ip, protocol } = req;
  console.log(`ACCESS: ${method} ${protocol}://${hostname}${path} - ${ip}`);
  next();
}

function errorLog(err, req, res, next) {
  const { hostname, method, path, protocol } = req;
  console.log(`ERROR: ${method} ${protocol}://${hostname}${path} - ${err}`);
  // next(); // you can call either next or send a uniform error response
  res.status(500).send({ status: "server-error", message: err.message });
}

module.exports = { accessLog, errorLog };
You can then import these two functions into your index.js file and put them to use.
Be sure to place errorLog after all other routes.const express = require('express');
const app = express();
const port = 3000;
const { accessLog, errorLog } = require("./middleware/middleware");
app.use(accessLog);
app.get('/', (req, res) => {
res.status(200).send(`Hello from ${req.hostname}`);
});
app.use(errorLog);
app.listen(port, () => {
console.log(`Example app listening on port ${port}!`);
});
Now try and make a GET request to http://localhost:3000. You will note the access logger gets into action - and so will the error logger once something in your code goes sideways. You can test this by placing an obvious error into the .send - method.
res.status(200).send(`Hello from ${foo}`);
Since foo is undefined, you will receive a respective error message on the clientside, as well as in the console.
2. Set CORS and cache headers
HTTP headers help clients interpret the response they receive back from the server. Express middleware has access to the response object, so we can use a dedicated function to get an edge on common problems such as CORS or caching
Add the following to your middleware/index.js. The comments in the code will give you an idea of what the respective header controls.
function setHeaders(req, res, next) {
  // Allows resource sharing for clients that are hosted on
  // Different domains. Useful for public APIs
  res.setHeader("Access-Control-Allow-Origin", "*");

  // Restrict http - methods to a chosen few. This applies only
  // When the browser sends a Preflight request, e.g. when using
  // window.fetch().
  res.setHeader("Access-Control-Allow-Methods", "POST, PUT, DELETE, OPTIONS");

  // Add some basic cache control for requesting browsers
  res.setHeader("Cache-Control", "private, max-age=120");

  // Use this header to cache files that do not change often,
  // e.g. static HTML, CSS or Javascript for 5 days
  // res.setHeader("Cache-Control", "public, max-age=432000, immutable")

  // If you want no cache at all, uncomment this header
  // res.setHeader("Cache-Control": "no-store, max-age=0")

  // You can also remove standard headers. In case of express,
  // the following will get rid of the X-Powered-By header
  res.removeHeader('X-Powered-By');
  next();
}
Instead of applying the middleware globally, I would like to only apply it to the root path.
app.get('/', setHeaders, (req, res) => {
  res.status(200).send(`<h1>Hello from ${req.hostname}</h1>`)
})
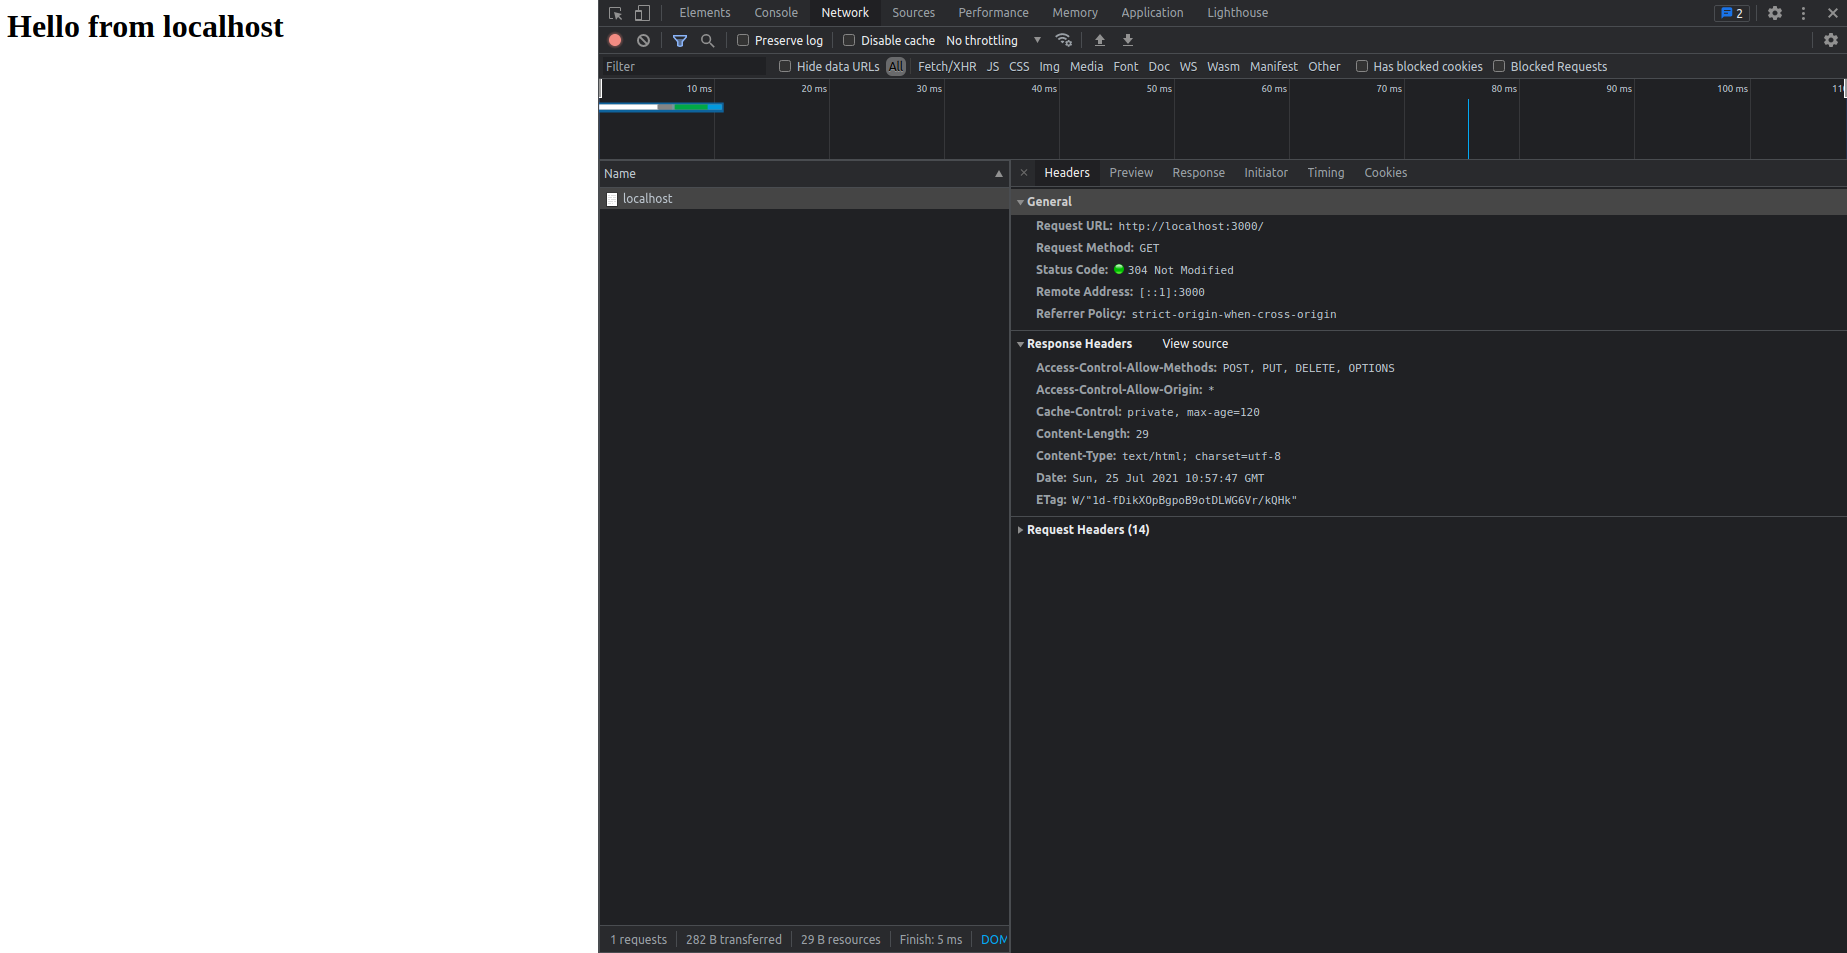
Let's now try and point the browser to localhost:3000. If you take a look into your developer tools, you'll see the responses headers being adjusted correctly.
If you would like to learn more about response headers, you can find some good resources and further reading on MDN.
3. Route guards
If you are running a private API, you will want to have an authorization and authentication check in place. To set up one for our middleware use case, we'll first create a new, private route. Then, we'll protect it with a simple, standardized authorization check.
Add the following code right after the / - route:
app.get('/private', (req, res) => {
  res.status(200).send(`<h1>Welcome back, ${req.locals.username}</h1>`)
});
To protect this newly created path, we'll use Basic Authorization. It requires the client to send a base64 - encoded string that includes the username and the matching password, separated by a colon.
If you are using Postman to follow along, you can use the built-in Authorization tab to enter a username and a password. For custom client requests, the built of a Basic Auth header follows this pattern:
Header key: authorization
Header value: 'Basic + base64(<username>:<password>)'
To interpret it on the server-side, we must first destructure and decode the authorization header. Once the username and password are readable, they will need to be compared to a valid user-password combination in a database or, in this case, a hardcoded pair of strings.
Note that you should never store cleartext passwords in a database. Instead, when creating an entry, use a library to create password hashes, such as bcrypt, and only compare the digest values.
Add the following to your middleware/index.js:
function validateUser(req, res, next) {
  const auth = req.headers.authorization;

  // If the client does not send auth - header, send a 401 response
  if (!auth) {
    return res.status(401).send({
      status: 'not-authenticated',
      message: 'The request does not contain a valid access header'
    })
  }

  // res.locals is commonly used to store temporary request data
  req.locals = { user: { name: null } };

  // Extract the username and password from the authroization header
  const baseValue = auth.replace('Basic ', '').trim();
  const baseString = Buffer.from(baseValue, 'base64').toString('utf-8');
  const [username, password] = baseString.split(':');

  // Check if user is permitted to access this resource
  if (username === 'user' && password === 'supersecret123') {
    req.locals.user.name = username;
    // Call next only if user may access paths protected by this middleware
    return next();
  } else {
    return res.status(403).send({
      status: 'not-authorized',
      message: 'You are not permitted to access this resource'
    })
  }
}
There are now three possible responses back to the client:
- No authorization header will result in the
401message. - Sending the wrong credentials will result in the
403message. - The correct credentials will allow the callback function of the route to be called.
Further reading and resources
If you would like to take a look at the finished code, you can find it on Github:
GitHub - tq-bit/article-express-middleware: A repository that holds some appliances for Express.js middleware.
A repository that holds some appliances for Express.js middleware. - GitHub - tq-bit/article-express-middleware: A repository that holds some appliances for Express.js middleware.
 tq-bit
In the next part, I will provide some more middleware use cases. If you would like to read about a specific topic, please reach out and share your ideas. A few more use cases I could envision are:
- Orchestrate other API endpoints inside your app's middleware. E.g. automatic currency conversion with Frankfurter when receiving a user's input.
- Resize big images or lowering their quality before saving them to a database
- Notify connected clients whenever a specific route is called.
