
Table of contents
Declaring a local state with references is a good start. Still, in all but the most simple cases, you will want your components to be able to interact with one another. That's where properties and events come into play.
In case you're after the code, check out this repos' branch
Like in the previous article, this approach focuses on Vue's Composition API.
Properties in modern Vue 3
Like in its previous release, properties in Vue 3 can be assigned using the Vue instance's $props. And you were already able to type properties when using the Object - syntax:
export default {
...
    props: {
        username: {
               type: String,
               required: true
        }
    }
...
}
This syntax grows verbose quickly, especially in bigger projects. And we're not even talking about prop duplication.
Property declaration
In Vue 3's setup syntax, we can declare properties and events using compiler macros. These charming APIs allow us to use Typescript for our component's type annotations.
Compiler macros do not need to be imported, they'll be compiled during
Instead of the above property declaration, write:
<script setup lang="ts">
const props = defineProps<{username: string}>()

// If username is optional:
const props = defineProps<{username?: string}>()
</script>
Properties with default values
If you would like to set a default value, wrap your defineProps with withDefaults like so:
<script setup lang="ts">
const props = withDefaults(defineProps<{
    username: string
}>(), {
    username: 'tq-bit'
})
</script>
Events in modern Vue 3
As for props, there's a compiler macro to declare your events. It can be used in two ways:
- Declare an array of event names the component emits
- Declare events with their expected payload
Both make use of Typescript syntax and offer great Intellisense support.
Declare events by name
Create a variable named emit. Inside a script setup component, it replaces the Vue instance's $emit method. And it's automatically available to the template.
<script setup lang="ts">
const emit = defineEmits<['updateUsername']>
</script>

<template>
    <input @input="emit('updateUsername')" />
</template>
Declare events by name and payload
The above example component is incomplete. It does emit an event but without a payload. Let's tackle that problem next.
Instead of using an array of named events, we can type several events with their payload.
<script setup lang="ts">
const emit = defineEmits<{
    (event: 'updateUsername', payload: string): void;
}>
</script>

<template>
    <input @input="emit('updateUsername', ($event.target as HTMLInputElement).value))" />
</template>
v-model in Vue 3
If props and events can be typed, then v-model should be typeable as well, right?
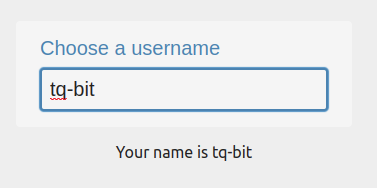
Let's find out by putting our new knowledge to use. We'll build a super simple, fully v-model compatible input component. It'll look like this:
Start with this Github repos. Clone it to your local machine and:
- create the
AppInput.vuecomponent insrc/components/ - grab the below boilerplate code and add it to the respective file
AppInput.vue
<script setup lang="ts">
withDefaults(defineProps<{}>(),{});
const emit = defineEmits<{}>();
</script>

<template>
	<div class="input__wrapper">
		<label class="input__label" v-if="label" for="">{{ label }}</label>
		<input
			class="input__field"
			v-bind="$attrs"
			:placeholder="label ? label : ''"
		/>
	</div>
</template>

<style scoped>
.input__wrapper {
    display: block;
	margin: auto;
	text-align: left;
	width: fit-content;
	margin-top: 1rem;
    background-color: var(--background-color-secondary);
    padding: 1rem 1.5rem;
    border-radius: 4px;
}
.input__label,
.input__field {
	display: block;
	font-size: 1.25rem;
    background-color: var(--background-color-secondary);
}

.input__label {
    color: var(--accent-color-secondary)
}

.input__field {
	padding: 0.5rem;
	width: 18rem;
	border: 2px solid var(--accent-color-secondary);
	border-radius: 4px;
	margin-top: 0.5rem;
    transition: all 0.25s;
}
.input__field:focus {
    transition: all 0.25s;
    outline: none;
    box-shadow: var(--accent-color-primary) 0 0 2px 1px;
}
</style>
Declare props and events
Props for v-model
Our input element will incorporate these three properties
- an optional
label - a
requiredindicator with a boolean type - a
value, more specifically, amodelValuethat can be text or numeric
So replace the prop definitions with the following:
withDefaults(
	defineProps<{
		label?: string;
		required: boolean;
		modelValue: string | number;
	}>(),
	{
		required: false,
		modelValue: '',
	}
);
The modelValue is part of v-model. It's used for data binding during template compilation. Make sure to have it declared and properly typed.
Then, bind it to the input element:
<input
    class="input__field"
    v-bind="$attrs"
    :value="modelValue"
	:placeholder="label ? label : ''"
/>
Events for v-model
We will need only a single event here. It's to be emitted whenever the component's value changes. This means: When our modelValue changes. When triggered, it must pass the component's inner value with it.
Replace the emit definition with the following:
const emit = defineEmits<{
    (event: 'update:modelValue', payload: string): void;
}>();
update:modelValue is the second part of v-model. It synchronizes the component's inner state with the outer one.
We can then bind the event to the input element:
<input
    class="input__field"
    v-bind="$attrs"
    @input="emit('update:modelValue', ($event.target as HTMLInputElement).value)"
    :value="modelValue"
	:placeholder="label ? label : ''"
/>
Import the component and bind a value
Let's try our component out. Open the App.vue file and replace the boilerplate code with the following:
<script setup lang="ts">
import { ref } from 'vue';
import AppInput from './components/AppInput.vue';

const username = ref<string>('');
</script>

<template>
	<app-input label="Choose a username" v-model="username"></app-input>
	<p v-if="username">
		Your name is <output> {{ username }} </output>
	</p>

	<p v-else>Enter your username</p>
</template>
You will notice the reactive username is now updated when the input value changes!
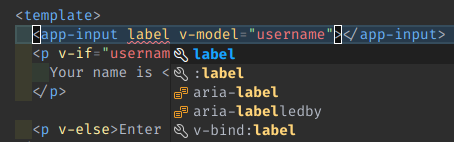
And if you have the Vue Language Features extension enabled in VSCode, you'll receive intelligent code autocompletion for your component:
Working with other input types
Especially select and checkbox fields must be accessed differently. Please have a look at my form showcase for more examples.
For select
For this example, I'm assuming that a parent component passes in a property array named options. The array must either
- include only strings
- include objects with two properties:
keyandvalue
Example:{ key: 1, value: 'one' }
<select
    class="select"
    v-bind="{
      ...$attrs,
      onChange: (event) => emit('update:modelValue', event.target.value),
    }"
    ...
>
    <option
      v-for="option in options"
      :value="option.value ? option.value : option"
      :key="option.key ? option.key : option"
      :selected="option === modelValue"
     > ... </option>
</select>
For type=checkbox
<input
    type="checkbox"
    class="checkbox"
    @change="$emit('update:modelValue', $event.target.checked)"
    :checked="modelValue"
/>
