
Reactivity is the buzzword in every frontend framework. And Vue's reactivity module makes handling state a breeze. In this article, we'll explore how to apply fundamental reactivity concepts to a Vue app. And how Typescript helps us by making our reactive data more robust.
Table of contents
Previously, we scratched the surface of how Vue 3 and Typescript play together. Let's now dive deeper into Vue's reactivity behavior and template references. We'll start with a bit of theory and then build our own audio player component 🎶.
You can find the code in this repos' branch 'refs-and-reactivity'
Reactivity in a nutshell
A reactive variable's value can be tracked. It's like putting a locator on your dog's collar. Whenever it makes a move, the device's geodata updates. You can then act accordingly. Perhaps they went astray, and you'll have to fetch them.
If you'd like to learn more about reactivity, check out this article or the official Vue 3 docs
Reactivity in Vue
In Vue 2, reactivity was handled automatically by adding properties to a Vue instance's data. While this is still valid for Vue 3, the remainder of this article focuses on the natively implemented Composition API.
Reactive data
Creating reactive data with the Composition API is still straightforward. We import a single function named ref and wrap it around a value. Vue allows us to optionally declare a type.
<script setup lang="ts">
import { ref } from 'vue';

const count = ref<number | null>(0);
const increment = () => count.value++;
</script>
Note that to access or mutate count, you must access it by its .value propertyComputed properties
Like ref, computed replaces its Vue instance's equivalent. It accepts a single function that re-runs whenever dependent variables change. Let's have a look:
<script setup lang="ts">
import { ref, computed } from 'vue';

const count = ref<number | null>(0);
const increment = () => count.value++;
const doubleCount = ref<number>computed(() => count.value * 2)
</script>
'Reactive' HTML elements
Instead of referring to HTML elements by this.$refs, we use the imported ref wrapper. The selected elements are not really reactive. But we have direct access to the node, all its properties, and methods.
<script setup lang="ts">
import { ref } from 'vue';

const audioPlayerElement = ref<HTMLAudioElement>();
</script>

<template>
<audio ref="audioPlayerElement">
    <source type="audio/mpeg" />
</audio>
</template>
Let's build an audio player component
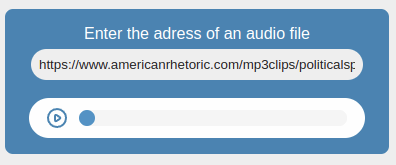
With the theory out of the way, let's put this to practice. We will create a super simple audio player element to incorporate the above.
It will look like this:
Start with this Github repos. Clone it to your local machine and:
- create the
AppAudioPlayer.vuecomponent insrc/components/ - create a folder named
iconsundersrc/components/ - grab the below boilerplate code and add it to the respective files
AppAudioplayer.vue
This gist's code will provide you with the layout and styles for the component. We'll use the native audio element and build a wrapper around it that can be styled.
Empty boilerplate for an audio player Vue component
Empty boilerplate for an audio player Vue component - AppAudioPlayer.vue
 262588213843476
Icons
We'll use tweaked icons from Heroicons to make the audio player more approachable. Add them under the following filenames:
iPlay.vue
<template>
  <svg
    xmlns="http://www.w3.org/2000/svg"
    class="icon"
    fill="transparent"
    viewBox="0 0 24 24"
    stroke-width="2"
  >
    <path
      stroke-linecap="round"
      stroke-linejoin="round"
      d="M14.752 11.168l-3.197-2.132A1 1 0 0010 9.87v4.263a1 1 0 001.555.832l3.197-2.132a1 1 0 000-1.664z"
    />
    <path stroke-linecap="round" stroke-linejoin="round" d="M21 12a9 9 0 11-18 0 9 9 0 0118 0z" />
  </svg>
</template>
iPause.vue
<template>
  <svg
    xmlns="http://www.w3.org/2000/svg"
    class="icon"
    fill="none"
    viewBox="0 0 24 24"
    stroke-width="2"
  >
    <path
      stroke-linecap="round"
      stroke-linejoin="round"
      d="M10 9v6m4-6v6m7-3a9 9 0 11-18 0 9 9 0 0118 0z"
    />
  </svg>
</template>
Declare the reactive data
Several variables want to be declared in the AppAudioPlayer.vue file.
const currentAudioFileSource = null;
const previousAudioFileSource = null;
const playbackTime = null;
const audioDuration = null;
const isPlaying = null;
- We will want the
currentAudioFileSourceandpreviousAudioFileSourceto be initially declared as the constDEFAULT_AUDIO_ADDRESS playbackTimemonitors the playback time of the audio file and is initialized as 0audioDurationholds the current file's duration. It's initialized asInfinityisPlayingtells whether the player is currently running or not
Fairly simple. Here's the result:
const currentAudioFileSource = ref<string>(DEFAULT_AUDIO_ADDRESS);
const previousAudioFileSource = ref<string>(DEFAULT_AUDIO_ADDRESS);
const playbackTime = ref<number>(0);
const audioDuration = ref<number>(Infinity);
const isPlaying = ref<boolean>(false);
Declare the computed properties
Whenever a user sets a new URL, we'll update our currentAudioFileSource. But only if the new source differs from the old one.
audioSourceChangedindicates if the current audio source differs from the previous one
const audioSourceChanged = computed<boolean>(
	() => previousAudioFileSource.value !== currentAudioFileSource.value
);
Register the audio element
Finally, we must link our data to the native audio element. It's responsible for playback when the user interacts with the component.
There are three things we need to do:
- Grab the audio player's reference from the template
- Hook into the audio player's lifecycle methods
- Synchronize the audio player and the component
Declare the player's reference
This means: Make the audio-DOM node available as an object within our component's script. Make sure the constant's name is equal to the template reference => audioPlayerElement.
const audioPlayerElement = ref<HTMLAudioElement>();
Hook into the player's lifecycle methods
The audio element emits events during its lifecycle or when inner values change. We can subscribe - or hook into - these and apply our own logic. There are other features to consider, but let's focus on these two:
- We must sync the inner duration and playback time with our component
- We must know when the audio player's track reaches the end
So we must consider the ontimeupdate and onended events.
const registerAudioPlayer = (): void => {
	if (audioPlayerElement.value) {
		audioPlayerElement.value.ontimeupdate = () => {
			audioDuration.value = audioPlayerElement.value?.duration || Infinity;
			playbackTime.value = audioPlayerElement.value?.currentTime || 0;
		};
		audioPlayerElement.value.onended = () => {
			isPlaying.value = false;
		};
	}
};
Sync the player and the component
Maybe you noticed the third imported method from vue - onMounted. It is one of the lifecycle methods - or lifecycle hooks - a component goes through. Here, we'll use it to synchronize our component with its inner audio element.
onMounted(() => registerAudioPlayer());
That's all? What's with the empty functions?
I don't want to spoil the surprise. So bear with me.
What we did so far was:
- to learn about refs and computed props
- how to type reactive data
- how to reference - and interact with - a native
audioelement
I dare you now to write the logic for the still empty functions yourself. If you get stuck somewhere, check in with my solutions. But I believe you'll see the benefit of typing your data much better when you've experienced it firsthand.
A few last words of advice:
- Use VSCode + the Vue Language Features (formerly Volar) extension to reap the full Vue+TS harvest
- To type the
event.target.valueinside an event callback, use
+(ev.target as HTMLInputElement).value;
