Copying and pasting text once doesn't take much time, but subsequent CRTL - parsing gets old pretty quick. Read on to find out how to leave this task to the browser, not to your reader.
Table of contents
Copying data from the browser into your clipboard is a small feature, yet quite powerful one. No more manual selecting & crtl + c does save a bit of time when following larger coding articles. I've just added the small clipboard sign next to all my snippets for a reader's convenience myself. Read on to find out how I did it.
Boilerplate
Create a index.html file, as well as a main.js file in a directory of your choice. Fill the index - file up with the following and let's jump in.
<!DOCTYPE html>
<html lang="en">
  <head>
    <meta charset="UTF-8" />
    <meta http-equiv="X-UA-Compatible" content="IE=edge" />
    <meta name="viewport" content="width=device-width, initial-scale=1.0" />
    <title>Copy to clipboard</title>
  </head>
  <body>
    <h1>With textarea</h1>
    <section>
      <textarea
        placeholder="Write your content here and press 'Copy Text'"
        id="clipboard-area"
        cols="30"
        rows="2"
      ></textarea>
      <textarea
        placeholder="Paste your content here"
        cols="30"
        rows="2"
      ></textarea>
    </section>
    <button style="width: 260px" onclick="handleCopyTextFromArea()">
      Copy text
    </button>

    <h1>Without textarea</h1>
    <section style="display: flex">
      <p style="width: 260px; margin: 0">
        Lorem ipsum, dolor sit amet consectetur adipisicing elit.
      </p>
      <textarea
        placeholder="Paste your content here"
        cols="30"
        rows="2"
      ></textarea>
    </section>
    <button style="width: 260px" onclick="handleCopyTextFromParagraph()">
      Copy text
    </button>

    <script src="main.js"></script>
  </body>
</html>
We'll have two functions attached to the buttons - handleCopyTextFromArea andhandleCopyTextFromParagraph - let's fill them with life.

Method 1: execCommand('copy')
While the functionality of this method is deprecated according to MDN docs, it still works well with a textarea - HTML tag. And even if you do not have such available, creating it - and filling its value with the desired text content - is done very quickly.
If you have a text area available, add the following to your index.html
function handleCopyTextFromArea() {
  const area = document.querySelector('#clipboard-area')
  area.select();
  document.execCommand('copy')
}
If you do not have said element at your disposal, you can just add it for the time copying takes place. The below steps usually happen in a breeze, a user will not notice the extra tag is added and removed again:
- Create the
textareaelement and add it to the DOM. - Populate its value with the text from the paragraph - or any other element.
- Use the above
execCommand('copy')- method to copy the textual content - Remove the element again.
function handleCopyTextFromParagraph() {
  const body = document.querySelector('body');
  const paragraph = document.querySelector('p');
  const area = document.createElement('textarea');
  body.appendChild(area);

  area.value = paragraph.innerText;
  area.select();
  document.execCommand('copy');

  body.removeChild(area);
}
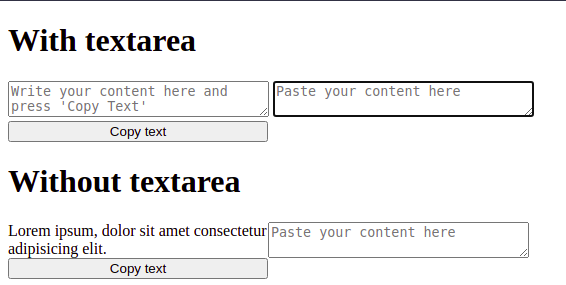
If you now try and crtl + v into the text area to the right, you should see the input being pasted. While this approach does still work very well, modern browsers have implemented their own interfaces to take care of clipboard features. Let's take a look at that next.
Method 2: Clipboard API
The clipboard API is a modern, promise-based approach that solely focuses on the clipboard instead of doing many things at once. It requests permission and works only over HTTPS, making it more secure by design. According to Can I use, older browsers do not support this functionality, therefore you might want to consider having the alternative in place as well.
Let's replace the above handleCopyTextFromParagraph function with the following:
function handleCopyTextFromParagraph() {
  const cb = navigator.clipboard;
  const paragraph = document.querySelector('p');
  cb.writeText(paragraph.innerText).then(() => alert('Text copied'));
}
And that's about it, really. You might want to replace the .then() - callback with some neater type of user feedback and check for user permission, still - goal achieved - the text is available and ready to be parsed.
UPDATE: Copy to clipboard with Vue 3 directive
If you're using Vue.js to build your application, you can wrap the above function using a Vue custom directive. Doing so provides you a simple, reusable method to achieve the same functionality by clicking on (or interacting in any other way with) the component that has v-clip bound to it.
Declare the following function inside of your main.js file and have it registered globally after creating the Vue app:
const vClip = {
  # For Vue 2, you can use bind instead of mounted
  mounted: (el) => {
    el.addEventListener('click', () => {
      const cb = navigator.clipboard;

      // Check if the clicked on element is an input element
      const input = el.tagName === 'input' ?
          el :
          el.querySelector('input');

      // Copy the text to clipboard
      cb.writeText(input.value).then(() => alert('Text copied'));
    });
  },
};

// Create the app and mount it
const app = createApp(App);

app.directive('clip', vClip);
app.mount('#app');
Then, assume you have the following component:
<q-base-input
 label="Short link:"
 v-model="form.result"
 disabled />
You can then add v-clip to it:
<q-base-input
 label="Short link:"
 v-clip
 v-model="form.result"
 disabled />


