

IndexedDB is a low-level, asynchronous NoSQL database in the browser. It allows developers to store bigger amounts of data in a structured manner without having to rely on a backend service. This article aims to shed some light on the basic functionalities of the IndexedDB API
Table of contents
TL:DR Take me to the Github Repos or the Live Demo
⚠️
A note on browser behavior
Persistent storage implementation largely depends on the browser. For the sake of ease, the project for this article does not implement user-preference checks, such as asking for storage permission. It's up to you to implement them yourself and ensure browser compatibility.
Persistent storage implementation largely depends on the browser. For the sake of ease, the project for this article does not implement user-preference checks, such as asking for storage permission. It's up to you to implement them yourself and ensure browser compatibility.
About IndexedDB
IndexedDB vs. Web Storage
When compared to other web storage methods, IndexedDB comes with a few extra perks. It:
- works asynchronously, does not block the tab's main thread
- uses transactions to ensure data integrity
- allows for indexing and faster querying
- has increased storage capacity (depending on the browser)
Browser compatibility and usability
At the time of writing this article:
- IndexedDB ships with all modern browsers
- One of the core features to estimate storage quota was recently added with Safari 17
- A relatively new one, usage details, is still missing in several browsers
Storage quota and persistence
Browsers reserve space on your device's drive for persistence. They define a quota that governs the total amount of data to store.
Important: Quota does not only include IndexedDB, but also other web persistence APIs, caches and ServiceWorker registrations. Consider quota limits carefully when designing local storage strategies
The easiest way to find out how much storage your browser reserves is by calling the 'estimate' method:
(async function() {
    const estimate = await navigator.storage.estimate();
    console.log(estimate)
})()
Doing this on the google.com domain gives the following result:

The values' unit is shown in bytes. To determine the remaining MB/GB, divide the quota and usage by:
- quota / 1024 for KB (= 2097152 KB)
- quota / 1024² for MB (= 2048 MB)
- quota / 1024³ for GB (= 2GB)
In a nutshell, this means the origin 'google.com' has a total of 2GB quota on my hard drive available. It currently uses around 9kb of them.
Use cases
Offline-first scenarios
IndexedDB is particularly useful for storing data in Progressive Web Apps. Compared to the service worker's cache, data stored in IndexedDB remains easily accessible and resilient to data integrity problems during synchronization.
Client caching strategies
A few months ago, I reported to a German government institution. They requested many documents, preferably in PDF, over a portal platform. I had to upload each file in a separate file form field.
After ten-ish minutes, my form submission failed due to a server problem. The form data was deleted from the browser, including my documents.
It would've been a good idea to store these documents somewhere on the client before sending them to the server so I would not have to upload everything all over
But they weren't. So rinse and repeat from the beginning.
Implement data privacy
There are a few good reasons to consider local storage for privacy reasons. The most prominent are probably laws like the GDRP in Europe. For such it comes in handy if entered data never leaves the respective computer. IndexedDB provides a lot of relevant methods to handle everything your user needs.
Possible pitfalls
Accidental deletion by the user
Since the browser stores the data, they're easily deleted by incautious usage. When a user requests the browser to delete their data, this could include data stored by IndexedDB.
Data loss due to exceeded storage quota
Modern browsers reserve a lot of storage space for browsers. It is possible for data loss to occur once the required exceeds available storage space.
Unexpected browser behavior
With that, I don't mean the browser behaves in an unexpected manner. Much rather, its behavior is correct, you just wouldn't expect it. A prominent example is Apple's ITP policy for Safari, which removes stale data (including IndexedDB!) after seven days without interaction.
Implementation
So far, we've established a general understanding of the 'what's and 'why's. Let's dive into how to use IndexedDB next.
There's a GitHub repository that mirrors this article's content. If you'd like to follow along, start with its branch 01-start
Create the database and object-storage
Note: Check out branch 02-init-db for reference
Let's start by creating the database to save images. The process of doing so involves the following steps:
- Request the database using its name and version
- Create a store (or many stores) in which to save images
- Optional: Set up an index to query the store
- Return the created db instance for further usage
Request the database
We can use the 'IDBFactory.open(name, version)' method to request the database to open. If the version of the database you request does not exist yet, the browser will create it for you.
const request = indexedDB.open(dbName, dbVersion);
Handle the database request's events
Once the operation completes, the request emits three events:
- 'onerror' means: The database request failed
- 'onsuccess' means: The database request was successful
- 'onuptedeended' means: A new version of the database was created during the request. This event also fires when the database initializes for the first time
request.onerror = (event) => { /* handle the error event */ }
request.onsuccess = (event) => { /* handle the success event */ }
request.onupgradeneeded = (event) => { /* handle the upgrade event */ }
Add the code to initialize the database
In a nutshell, this is what's going to happen:
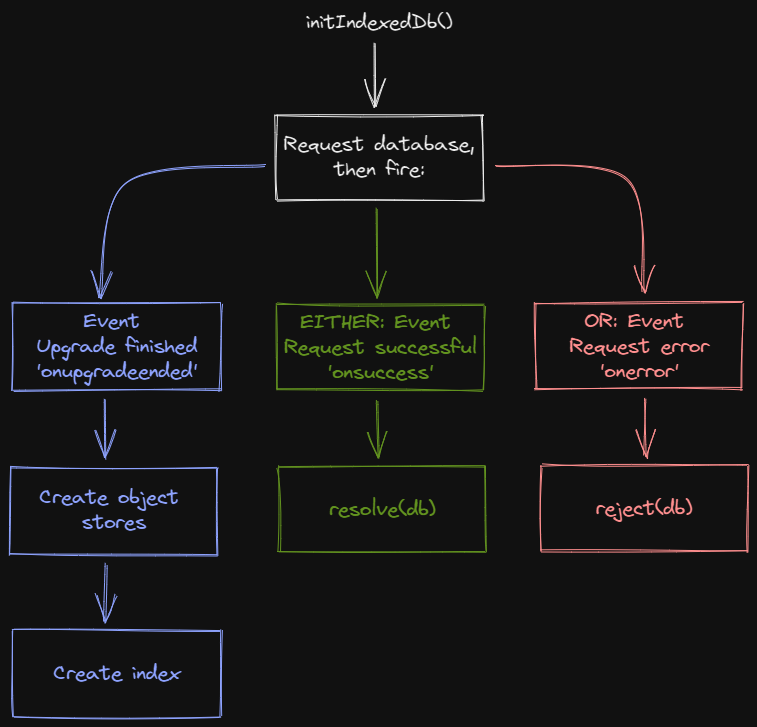
So go ahead and add the following to the 'initIndexedDb' - function:
const initIndexedDb = (dbName, stores) => {
	return new Promise((resolve, reject) => {
		const request = indexedDB.open(dbName, dbVersion);
		request.onerror = (event) => {
			reject(event.target.error);
		};
		request.onsuccess = (event) => {
			resolve(event.target.result);
		};
		request.onupgradeneeded = (event) => {
			stores.forEach((store) => {
				const objectStore = event.target.result.createObjectStore(store.name, {
					keyPath: store.keyPath,
				});
				objectStore.createIndex(store.keyPath, store.keyPath, { unique: true });
			});
		};
	});
};
Create a new database instance
The function is called as part of the window.load - event. It will set the global 'db' - variable to the created database instance.
// Create some constants for the store's name and key
const storeName = 'localFiles';
const storeKey = 'fileName';

// Create a db - variable to access the database after creation
let db = null;

// The function you just created
const initIndexedDb = (dbName, stores) => { /* ... */}

// Attach IndexedDB - creation to the window.onload - event
window.addEventListener('load', async () => {
	db = await initIndexedDb('my-db', [{ name: storeName, keyPath: storeKey }]);
})
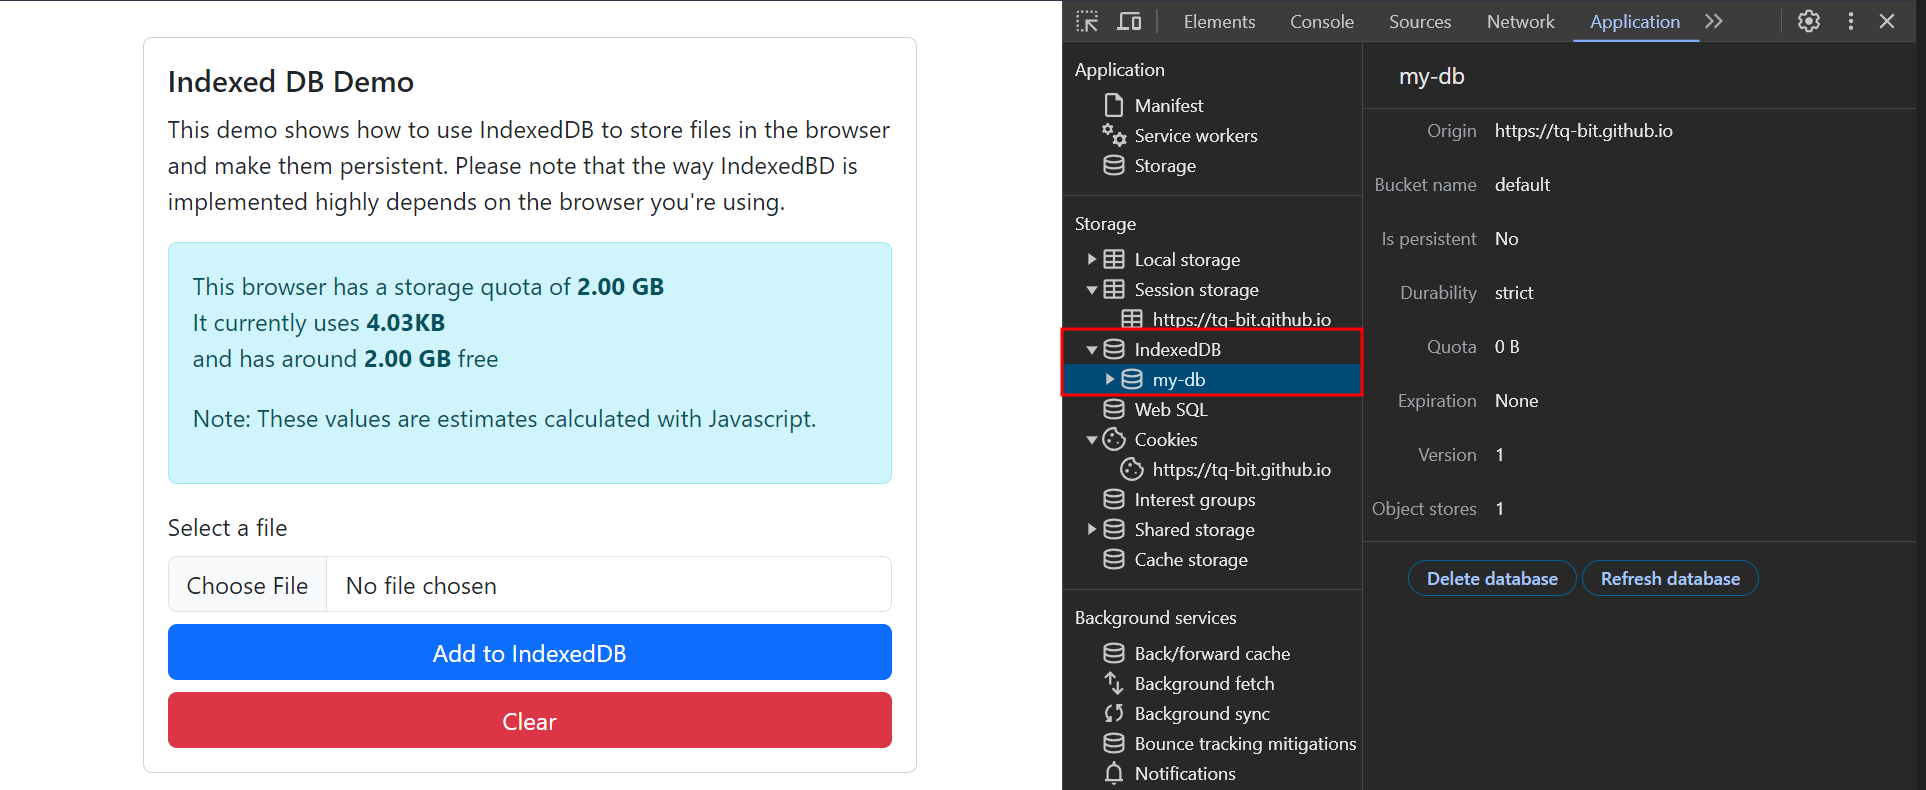
Validate the database's creation
You can also see the new database in your browser's dev tools:
Add a new image and show it in the UI
Note: Check out branch 03-add-images for reference
Now that our database is in place, we can start populating it. IndexedDB stores data in key-value pairs. In the case of this implementation, keys are equal to the file's name. We'll use them to engineer the search feature later, too.
Create a new file-entry
Let's start by adding to the 'handleSubmit' function. It fires once the user clicks on the 'Add to IndexedDB' - button and does the following:
- Grab the file's value from the input field
- Create a read-write-transaction
- Add the file to the object store
- Re-render the gallery cards below the form
- Update the storage quota in the UI
Let's add the following code the the 'handleSubmit' function:
const handleSubmit = async (ev) => {
	ev.preventDefault();
	const file = await getFileFromInput();
	const store = db.transaction(storeName, 'readwrite').objectStore(storeName);
	store.add(file);

	store.transaction.oncomplete = () => {
		clearGalleryImages();
		renderAvailableImagesFromDb();
		renderStorageQuotaInfo();
	};
};
Re-render the image gallery
To access the new file, the previous transaction must complete. We'll then use a cursor to iterate over all database entries and render them into the UI. A cursor will provide us with the database's respective record's key and value.
Add the following code to the 'renderAvailableImagesFromDb' function:
const renderAvailableImagesFromDb = () => {
db.transaction(storeName, 'readonly').objectStore(storeName).openCursor().onsuccess = (event) => {
const cursor = event.target.result;
if (cursor) {
renderGalleryColumn(cursor);
cursor.continue();
}
};
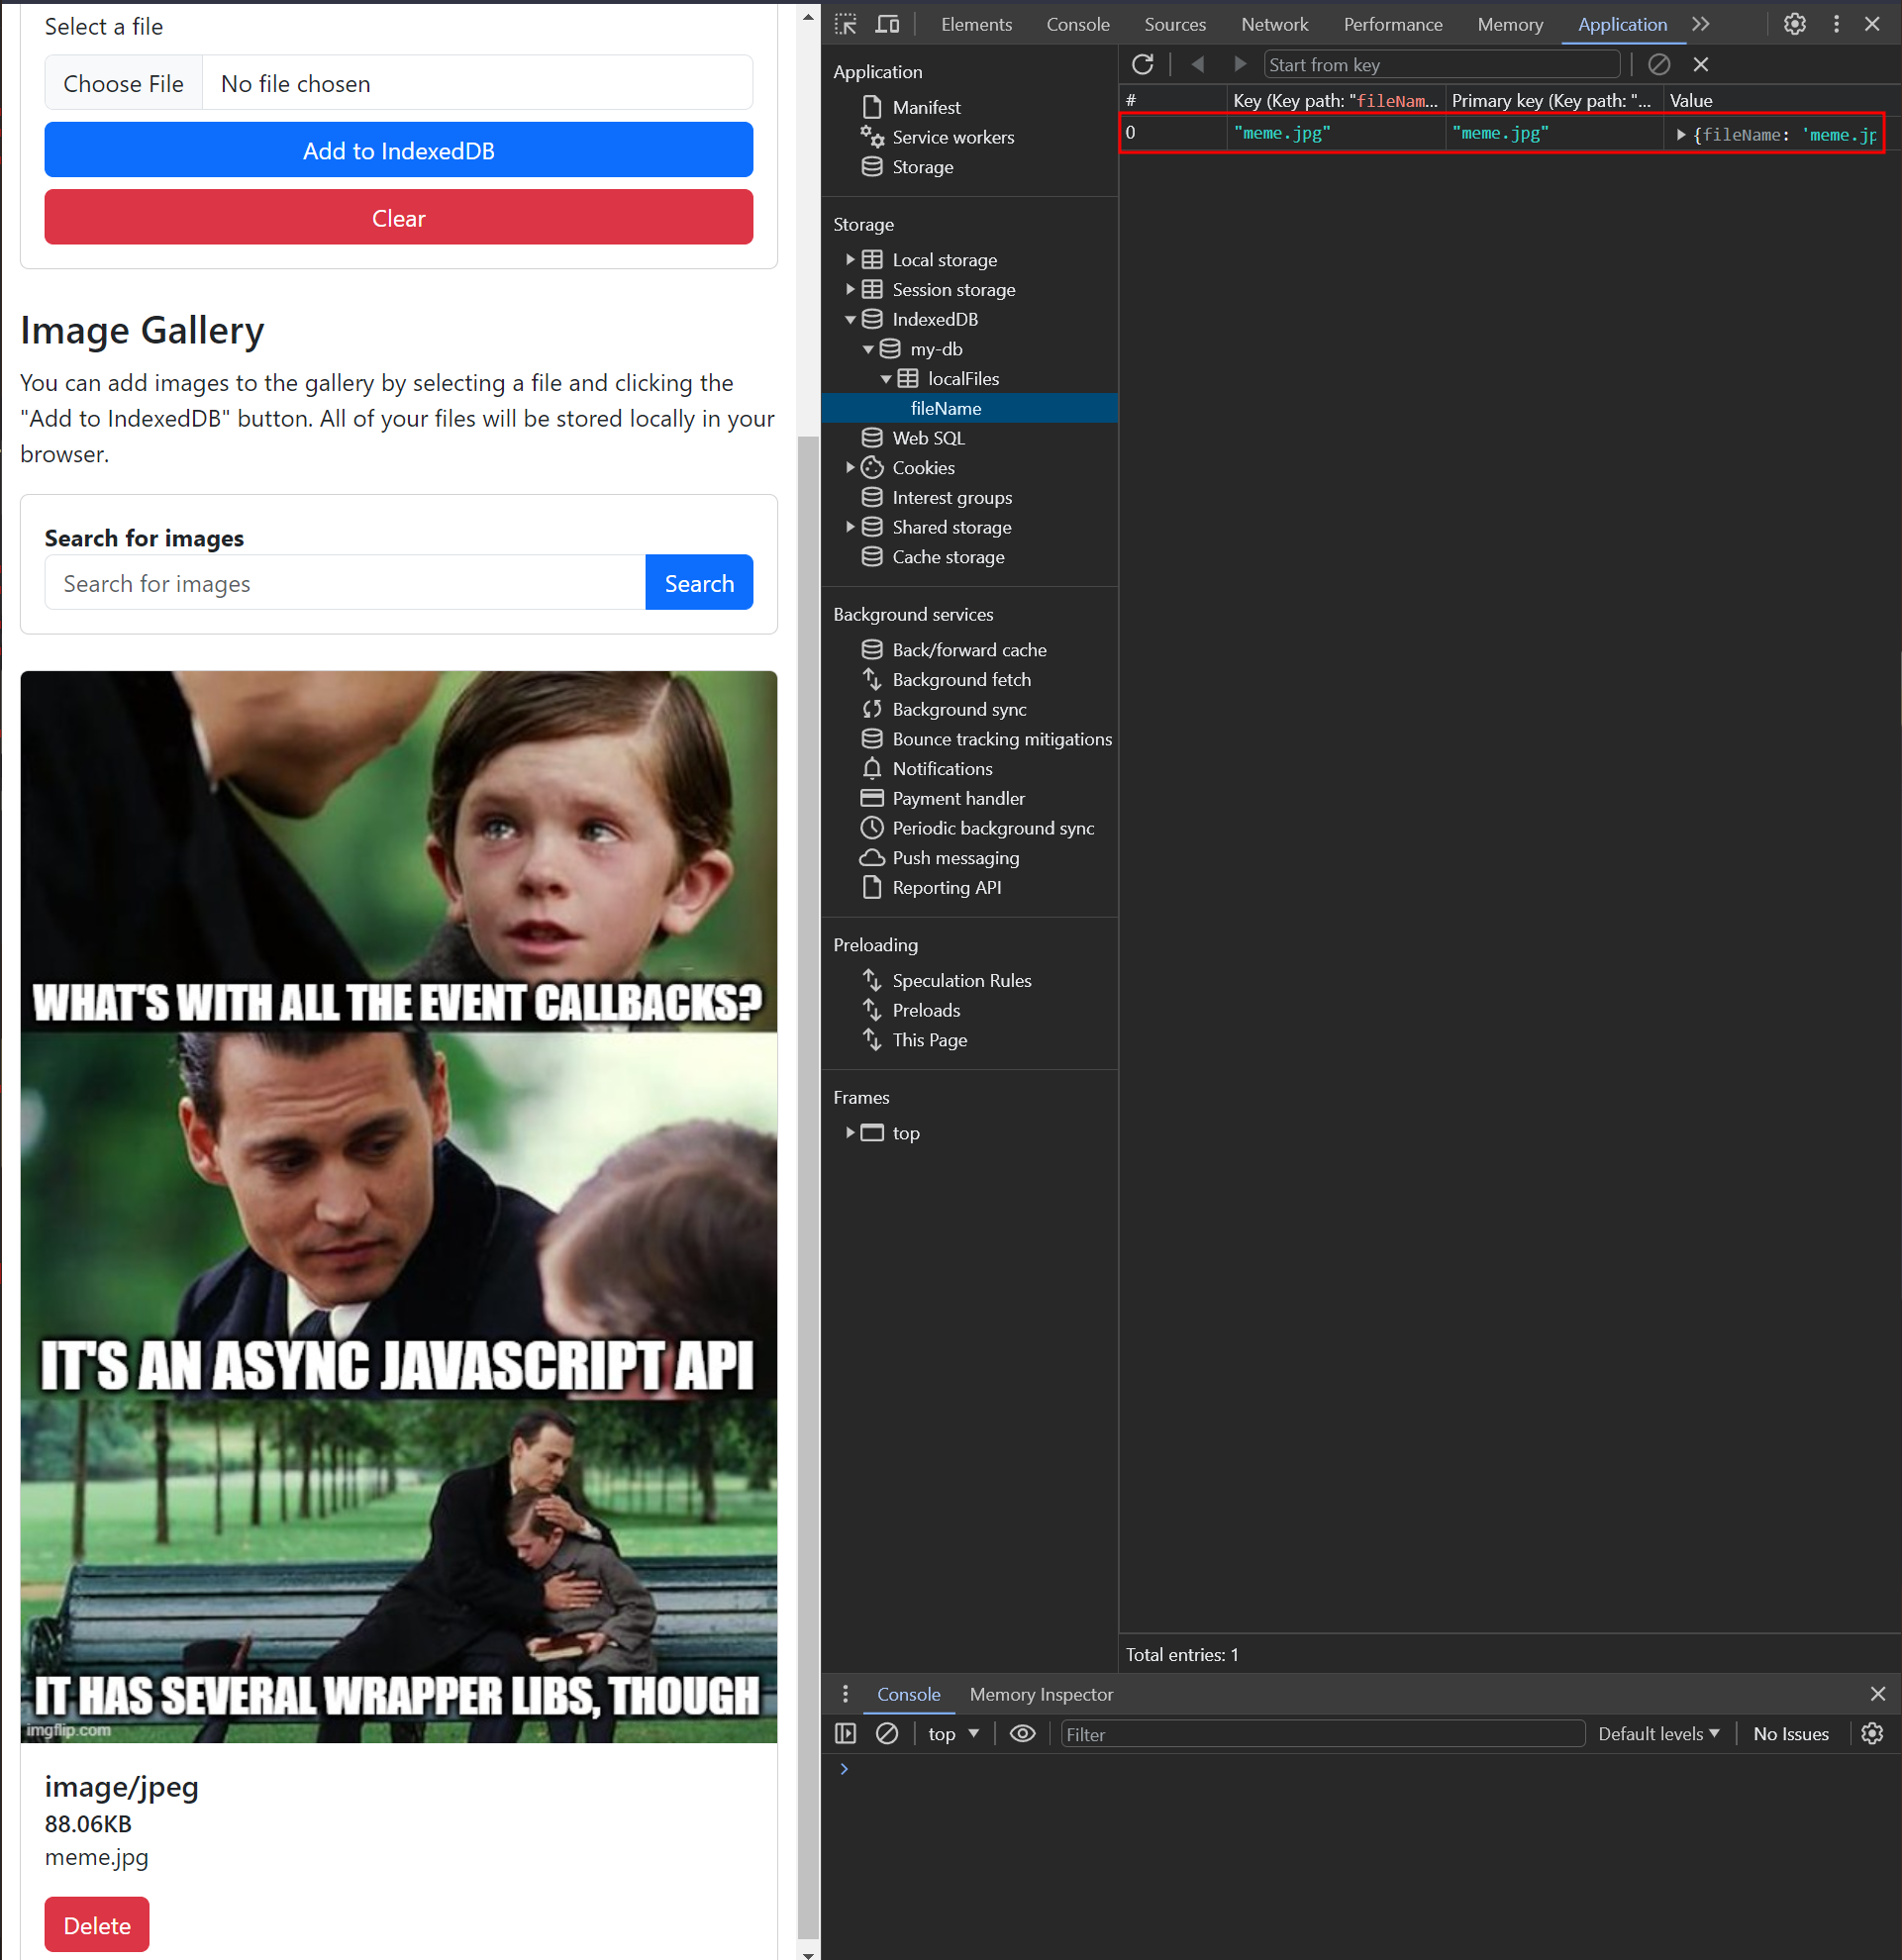
};
Now you can start adding files to your database. Check out your devtools under 'Application' to see them getting stored in your browser.
Execute a search query
Note: Check out branch 04-search for reference
Querying for files works in a similar manner. Instead of rendering all available images, we'll only render those relevant to the search term.
Add the following code to your 'handleSearch' function:
const handleSearch = async (ev) => {
	ev.preventDefault();
	clearGalleryImages();
	const searchInput = document.getElementById('search').value;
	db.transaction(storeName, 'readonly').objectStore(storeName).openCursor().onsuccess = (event) => {
		const cursor = event.target.result;
		if (cursor) {
			if (cursor.value[storeKey].toLowerCase().includes(searchInput.toLowerCase())) {
				renderGalleryColumn(cursor);
			}
			cursor.continue();
		}
	};
};
Delete images
Note: Check out branch 05-delete for reference
Let's wrap this article up by adding two delete functions
- One to delete a single image
- One to empty the whole object-store
Delete a single image
To delete a single entry, we need its key. In this project, it is already bound to the delete button's click event.
const renderGalleryColumn = (cursor) => {
    // ...
	deleteButton.addEventListener('click', () => {
		deleteImageFromIndexedDb(cursor.value[storeKey]);
	})
    // ...
}
All that's left to do is to:
- Call the 'delete(key)' method from the object store
- Re-render the remaining gallery entries once the transaction completes
Let's add the following code to the 'deleteImageFromIndexedDb' function:
const deleteImageFromIndexedDb = (storeKey) => {
	const store = db.transaction(storeName, 'readwrite').objectStore(storeName);
	store.delete(storeKey);
	store.transaction.oncomplete = async () => {
		clearGalleryImages();
		renderAvailableImagesFromDb();
		await renderStorageQuotaInfo();
	};
};
Delete all images
Finally, you can delete all entries from your database by calling the store 'clear()' - method:
const clearEntriesFromIndexedDb = () => {
	const store = db.transaction(storeName, 'readwrite').objectStore(storeName);

	store.clear();
	clearGalleryImages();

	store.transaction.oncomplete = () => {
		renderStorageQuotaInfo();
	};
};
