
SVGs are easily dropped into existing html content. But what if you wanted to add them dynamically, say to several DOM elements, with Javascript? Read on to find out how.
Table of contents
In a nutshell: What are SVGs?
If you've ever taken a small image and tried to scale it up in size, you know the struggle: It gets pixelated and the fonts become an unreadable raster of black-to-whiteish squares. Fortunately, there are resolutions to the matter, one of which has been standardized within the .svg file format. While other common formats, such as .png, are based on a grid of pixels, SVG consists out of a fixed set of shapes. The way these are drawn and aligned is described with XML - markup, more specifically with paths. This allows for more dynamic scaling.

In a nutshell, raw SVG files in the wilderness:
- are namespaced within their XML namespace (xmlns) - standard.
- contain one or several paths within the <svg /> - tags that make up the actual graphic.
- can be styled with CSS and inline styles.
Consider this example from Heroicons. If you drop the markup into an HTML file, it will render into the actual icon.
<svg xmlns="http://www.w3.org/2000/svg" class="h-6 w-6" fill="none" viewBox="0 0 24 24" stroke="currentColor">
  <path stroke-linecap="round" stroke-linejoin="round" stroke-width="2" d="M13.828 10.172a4 4 0 00-5.656 0l-4 4a4 4 0 105.656 5.656l1.102-1.101m-.758-4.899a4 4 0 005.656 0l4-4a4 4 0 00-5.656-5.656l-1.1 1.1" />
</svg>
Now that you've got a glimpse of the format, you might already have an idea how the post's topic is to be solved - using DOM - manipulation. So let's try and recreate the element above with Javascript.
Dynamic XML-node creation - boilerplate
XML differs from HTML in several aspects, the most relevant being that XML does not have predefined tags. Instead, it allows you to define these yourself within so-called namespaces.
This also allows for dynamically adding SVG icons to data from a remote location you'd like to bind to a client's interface while - or after - the data is being rendered. Let's assume you run a blog and would like to dynamically add the 'link'-icon from above before every post's heading. For a user's convenience, we'll add an anchor tag that permits the reader to scroll this post directly scroll it into their center of attention. To illustrate this example, let's start with the following boilerplate:
- We use a simple
index.htmlfile that holds a list of posts. - These posts are fetched from jsonplaceholder and dynamically added to the DOM by a function inside the
main.jsfile. main.cssprovides us a few basic styles for our list.
So launch your favorite text editor and add them to a free directory of your choice.
index.html
<!DOCTYPE html>
<html lang="en">
<head>
  <meta charset="UTF-8">
  <meta http-equiv="X-UA-Compatible" content="IE=edge">
  <meta name="viewport" content="width=device-width, initial-scale=1.0">
  <link rel="stylesheet" href="main.css">
  <title>Create SVGs with Javascript - Demo</title>
</head>
<body>
  <h1 class="site-header">
    Posts from today
  </h1>
  <main id="posts" class="post-list"></main>
  <script src="main.js"></script>
</body>
</html>
main.js
async function getPostData() {
  const url = 'https://jsonplaceholder.typicode.com/posts';
  const response = await fetch(url);
  return await response.json();
}

function renderPosts(app, posts) {
  const postNodes = posts.map((post) => {
    // Create the DOM elements
    const postCard = document.createElement('div');
    const postHeader = document.createElement('div');
    const postTitleAnchor = document.createElement('a');
    const postTitle = document.createElement('h2');
    const postText = document.createElement('p');

    // Add some classes and attributes
    postCard.classList.add('post-card');
    postHeader.classList.add('post-header');
    postTitle.classList.add('post-title')
    postTitle.id = post.title;
    postTitleAnchor.href = '#' + post.title;

    // Place the text content
    postTitle.textContent = post.title;
    postText.textContent = post.body;

    // TODO: Add the icon here

    // Put together the DOM nodes
    postHeader.appendChild(postTitleAnchor)
    postHeader.appendChild(postTitle);
    postCard.appendChild(postHeader);
    postCard.appendChild(postText);
    app.appendChild(postCard);

    return postCard;
  });
  return postNodes;
}

async function mountPosts() {
  const app = document.querySelector('#posts');
  const posts = await getPostData();
  renderPosts(app, posts);
}

mountPosts();
main.css
* {
  scroll-behavior: smooth;
}

body {
  font-family: 'Gill Sans', 'Gill Sans MT', Calibri, 'Trebuchet MS', sans-serif;
  background-color: blueviolet;
  margin: 0;
  padding: 0;
}

h1 {
  padding: 2rem 0;
  margin: 0;
}

.site-header {
  position: sticky;
  text-align: center;
  width: 100%;
  background-color: #fff;
}

.post-list {
  padding: 0 20vw;
}

.post-card {
  border-radius: 2rem;
  background-color: #fff;
  padding: 1rem 2rem;
  margin: 2rem;
}

.post-icon {
  transition: 0.25s all;
  border-radius: 0.25rem;
  height: 2rem;
  width: 2rem;
  margin-right: 0.5rem;
  padding: 0.25rem;
}

.post-icon:hover {
  transition: 0.5s all;
  background-color: blueviolet;
  stroke: white;
}

.post-header {
  display: flex;
  align-items: center;
}

@media only screen and (max-width: 1200px) {
  .post-list {
    padding: 0 10vw;
  }
}

@media only screen and (max-width: 600px) {
  .post-list {
    padding: 0 2vw;
  }
}
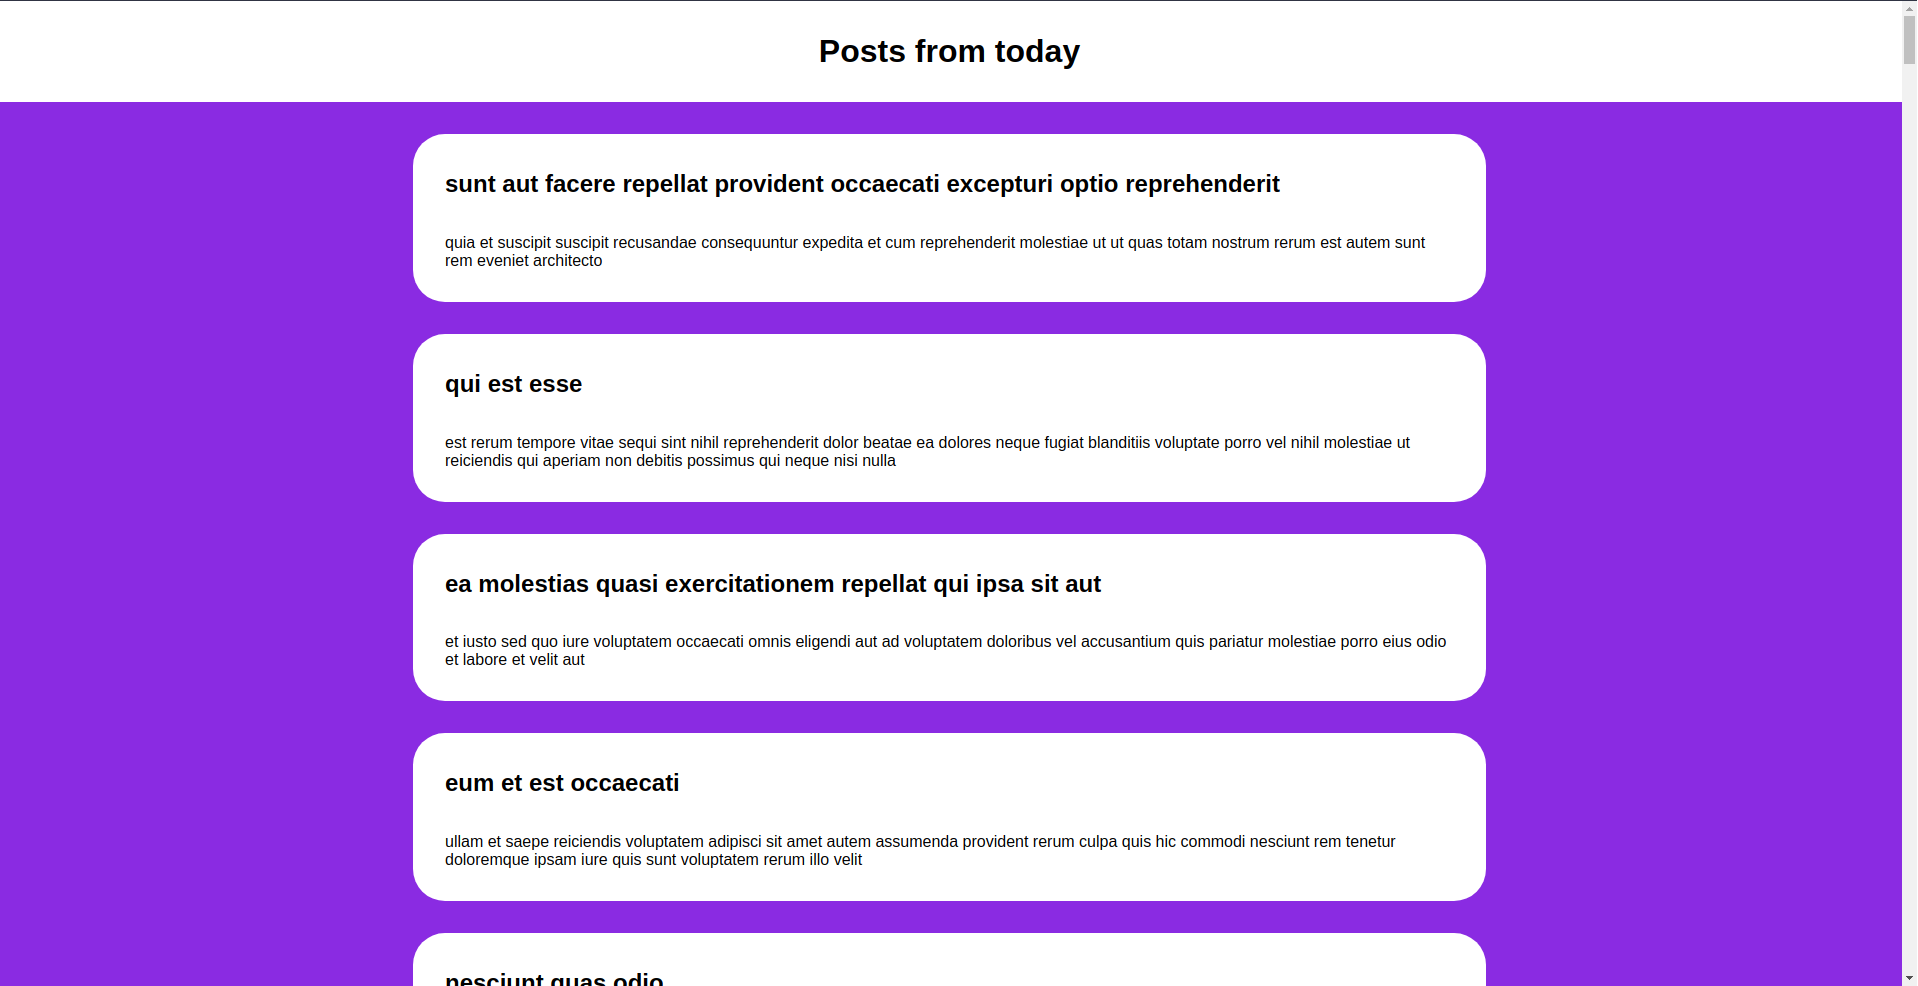
You'll receive a UI that looks like this, a simple and clean post collection.
Add a function to create the XML
Let's take a look at the XML file again:
<svg xmlns="http://www.w3.org/2000/svg" class="h-6 w-6" fill="none" viewBox="0 0 24 24" stroke="currentColor">
  <path stroke-linecap="round" stroke-linejoin="round" stroke-width="2" d="M13.828 10.172a4 4 0 00-5.656 0l-4 4a4 4 0 105.656 5.656l1.102-1.101m-.758-4.899a4 4 0 005.656 0l4-4a4 4 0 00-5.656-5.656l-1.1 1.1" />
</svg>
- It has a <svg /> tag as a wrapper which includes the namespace and some attributes.
- Within, there are one (or several) <path /> tags that describe the shape of the SVG.
- Inside the browser's context, both of these are interpreted and rendered like HTML tags.
The last point also implies that said XML tags can be created and composed like HTML elements. An <svg /> tag, for instance, can be created like this:
// Create an element within the svg - namespace (NS)
document.createElementNS('http://www.w3.org/2000/svg', 'svg');
From then on, the SVG can be mostly be handled like any other element. You can add styles, classes, and also - most importantly - attributes.
So let's add the following function to the main.js file. It will take in the anchor tag into which we will inject the created graphic, making it suitable for our scrolling feature.
function renderLinkIcon(node) {
  const iconSvg = document.createElementNS('http://www.w3.org/2000/svg', 'svg');
  const iconPath = document.createElementNS(
    'http://www.w3.org/2000/svg',
    'path'
  );

  iconSvg.setAttribute('fill', 'none');
  iconSvg.setAttribute('viewBox', '0 0 24 24');
  iconSvg.setAttribute('stroke', 'black');
  iconSvg.classList.add('post-icon');

  iconPath.setAttribute(
    'd',
    'M13.828 10.172a4 4 0 00-5.656 0l-4 4a4 4 0 105.656 5.656l1.102-1.101m-.758-4.899a4 4 0 005.656 0l4-4a4 4 0 00-5.656-5.656l-1.1 1.1'
  );
  iconPath.setAttribute('stroke-linecap', 'round');
  iconPath.setAttribute('stroke-linejoin', 'round');
  iconPath.setAttribute('stroke-width', '2');

  iconSvg.appendChild(iconPath);

  return node.appendChild(iconSvg);
}
Making it all functional
Now that we have all the building blocks in place that add the icon, let's put it to action.
Add the following inside the main.js file, right after placing the text content:
// TODO: Add the icon function here
renderLinkIcon(postTitleAnchor);
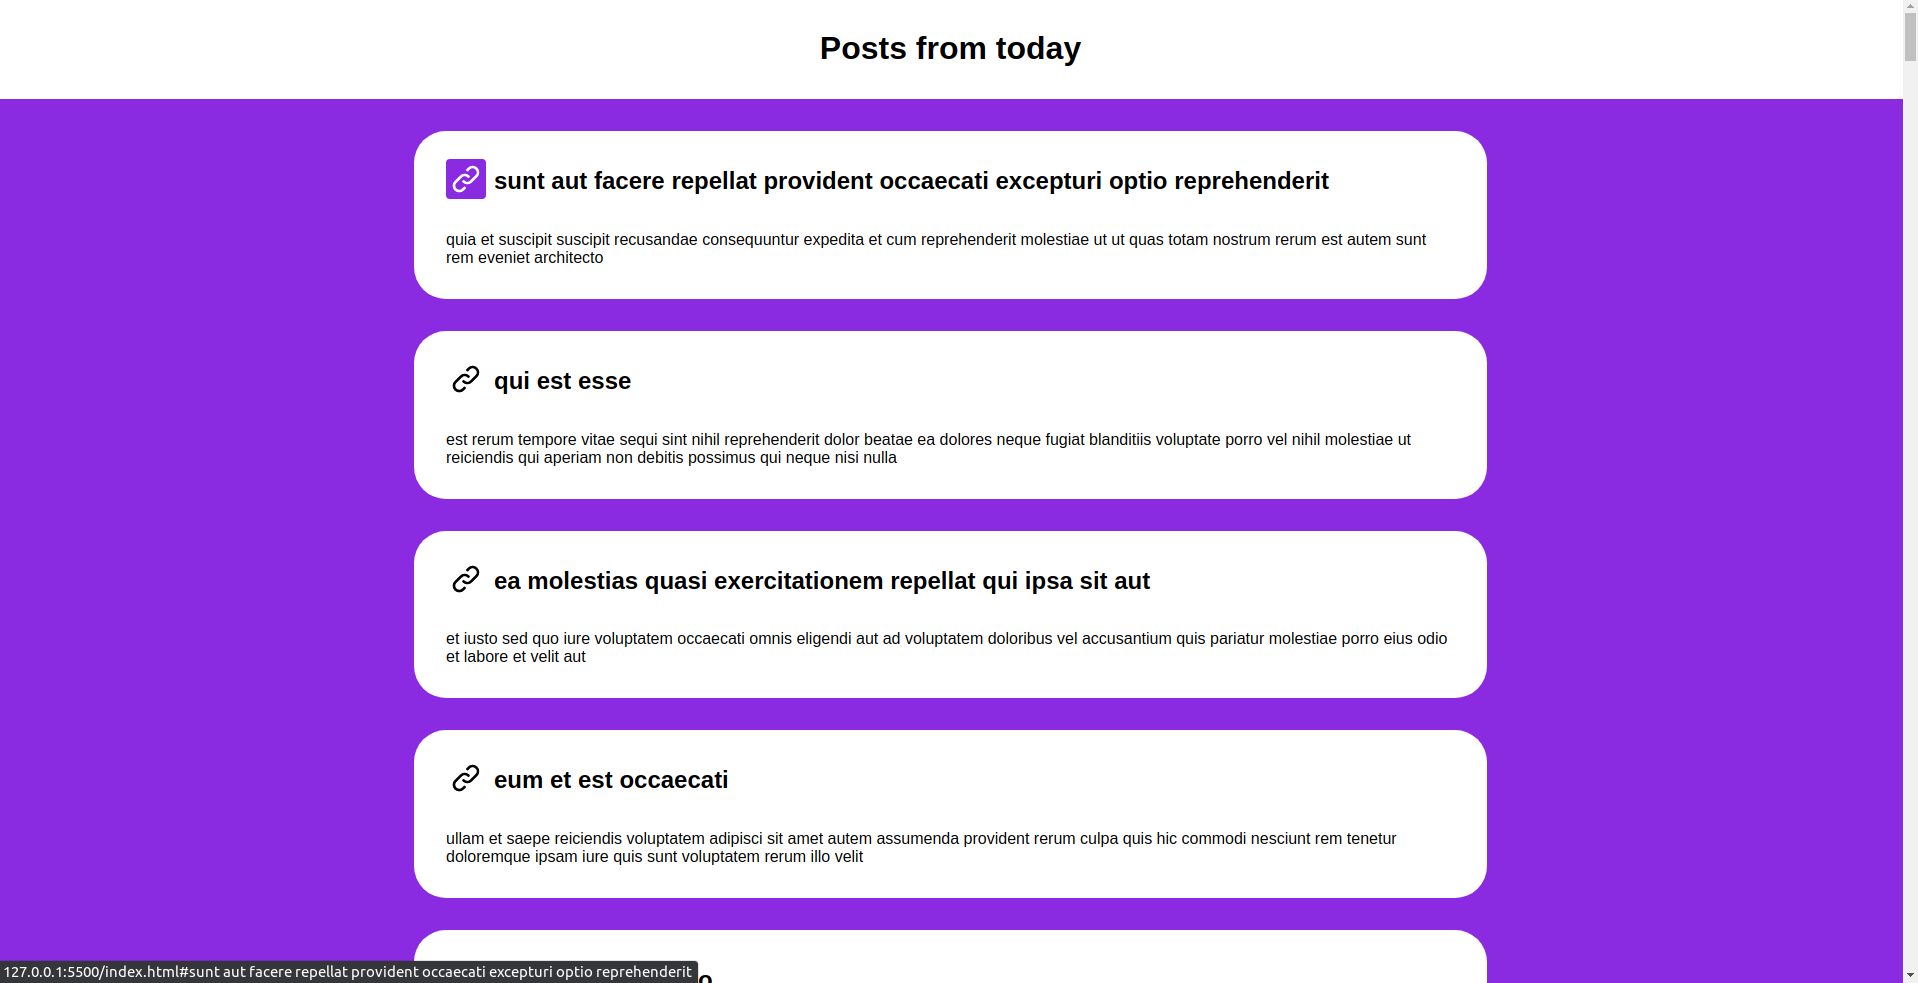
And that's it. The icons are prepended to each post and can easily be used as anchor links for smooth scrolling. Below goes the final result:
