
This article attempts to give you an idea of how to implement a search feature for your own Ghost blog. You'll learn how to create your own index, store it on the clientside and query it for results. In the related code repository, you can also find an implementation example.
Table of contents
Note: This article assumes that you have a basic idea about Ghost theme development. If you need a refresher, check out the official docs before reading ahead.
TL: DR - Take me to the code.
- The related partial
- The wrapper function
- The plugin registration (starting @ line 18)
- The gulp task to build the web worker (starting @ line 96)
The content of these files might change in the future, but the logic will remain the same.
Considerations for development
I created this feature with the following questions in mind:
- Where do I get the post data from? -> Ghost's Content API
- Do I want to execute an HTTP request every time I make a search? -> No
- How do I store relevant information in the client? -> I'll use a clientside index
- How do I create and search through an index? -> With the fantastic library Lunr.js
- Building an index takes time. How do I reduce stress on the main thread? -> By using a dedicated Web Worker to build the index every X hours
Naturally, you could do the same thing on the server-side. I'm happy with how the result turned out though. So let's dive in.
Build the partial
Link to Github: The related partial
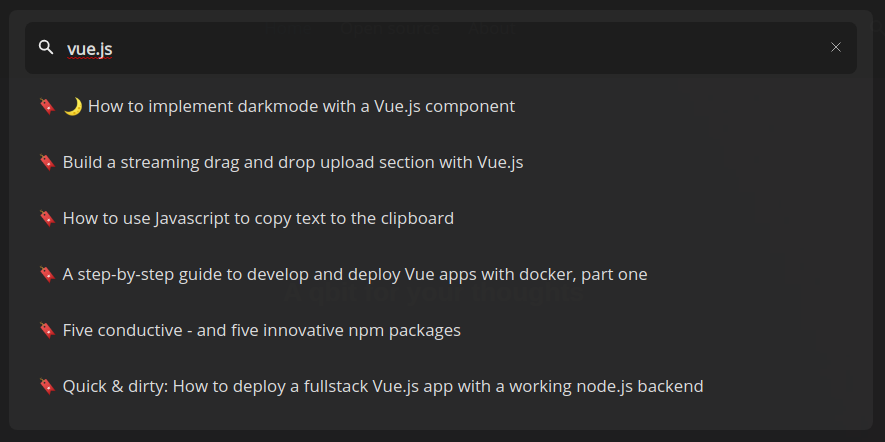
The result looks like this.

It will render all the results from my local index whenever a search is made by the user.
Register the plugin
To build an index, we need to feed it with data. We'll receive these from Ghost's content API, which requires an API key to be accessible. So head over to your admin panel and create a new integration.
Then, inject the API key, as well as the domain of your blog.
<script>
const Q_GHOST_API_ROOT = 'https://blog.q-bit.me';
const Q_GHOST_API_KEY = 'content-api-key';
</script>
Next, we can use the plugin useLunrSearch and extract the necessary functions:
const {
 initLocalIndex,
 search,
 // ... other methods
} = useLunrSearch(Q_GHOST_API_ROOT, Q_GHOST_API_KEY);
Let's check the next two functions in detail now.
Initialize a local index
We'll need to take the following three steps:
- Get the data from the API -> Done by function
fetchPosts(line 123) - Create an index -> Done by WebWorker's
buildIndex - Save the index and a timestamp to local storage -> Done by
saveIndex(line 113)
Let's take a look at how it's done in detail.
Get the posts
We've passed the URL, as well as the API - key to the parent function useLunrSearch, so they're both available within the nested function's scope. Since we will fetch the posts only once to build our index, I felt free enough to set the limit to a bigger number.
In the search.js file:
const fetchPosts = async (limit = 9999) => {
  if (!rootUrl) {
    console.warn('No rootUrl url specified. Using relative path');
  }
  if (!key) {
    throw new Error('No content api key found: Q_GHOST_API_KEY is undefined');
  }

  const url = rootUrl + path + '?limit=' + limit + '&key=' + key;
  const response = await fetch(url);
  const { meta, posts } = await response.json();
  return posts;
};
Build the index
As creating an index is a memory-intensive task, it makes sense to offload it to a Web Worker. It'll do its thing on a separate thread and delivers the result back when it's ready.
Make sure lunr.js is available in both, the search.js and the indexworker.js context - both files will be executed in separate contexts of the browser.
In the search.js - file
// register the worker
const indexWorker = new Worker('/assets/built/workers/indexworker.js');

//  get the posts
const posts = await fetchPosts();

// send them to the worker
indexWorker.postMessage(posts);

// receive the index back from the worker
indexWorker.onmessage = (ev) => {
 const { data: serializedIndex } = ev;
 const lunrIndex = JSON.parse(serializedIndex);
 const timestamp = saveIndex(lunrIndex);
 return timestamp;
};
// ...
And then in the indexworker.js file:
- We'll create a
blueprintvariable to hold the serialized title and the URL - We'll receive this string back when searching for posts - it'll be our reference
- Lunr then creates the index by classifying posts and adding documents to it
- Finally, the index is serialized and returned to the calling function when it's requested
const buildIndex = (posts) => {
  const documents = posts.map((post) => {
    const blueprint = JSON.stringify({ // 1
      title: post.title,
      url: post.url,
    });
    return {
      blueprint,
      title: post.title,
      excerpt: post.excerpt,
      html: post.html,
    };
  });

  const lunrIndex = lunr(function () {
    this.ref('blueprint'); // 2
    this.field('title');
    this.field('excerpt');
    this.field('html');
    documents.forEach(function (doc) {
      this.add(doc); // 3
    }, this);
  });
  return lunrIndex;
};

onmessage = ({ data }) => {
  const lunrIndex = buildIndex(data);
  const serializedIndex = JSON.stringify(lunrIndex); // 4
  postMessage(serializedIndex);
};
Store the result in local storage and retrieve it
Now that we've got the index, we'll have to store it somewhere. The easiest way to do so turned out to be local storage. And to ensure it is regularly updated, we'll add a timestamp to it when it's saved.
In the search.js - file
const saveIndex = (lunrIndex) => {
  const timestamp = new Date().getTime();
  const payload = {
    timestamp,
    lunrIndex,
  };
  localStorage.setItem(localIndexName, JSON.stringify(payload));
  return timestamp;
};

const getIndex = () => {
  const payload = JSON.parse(localStorage.getItem(localIndexName));
  if (payload) {
    return {
      timestamp: payload.timestamp,
      // Load the deserialized index
      lunrIndex: lunr.Index.load(payload.lunrIndex),
    };
  }
};
Query the index for blueprints
And that's it. We can now use getIndex and query for something a user puts in. In my example, I use the blueprints (serialized title & URL) to render a list of items.
In the search.js - file
const search = (ev) => {
  const {
    target: { value },
  } = ev;
  const { lunrIndex } = getIndex();
  const blueprints = queryIndex(lunrIndex, value);
  return renderQueryResults(value, blueprints);
};
If you are reading this post on my blog.q-bit.me, try and press CTRL + K to see the plugin in action.
This feature is part of my Ghost theme Candidus-Lite. If the post above helped you, I'd appreciate if you starred its repos on Github
