
Drag and drop in the browser can greatly improve user experience, and modern browsers allow for a very straightforward implementation. It is, however, tricky to put the pieces of the relevant browser APIs together. In this article, you'll find out how it can be done.
Table of contents
Fileuploads and the scope of this article
As this article's content is rather specific, please consider the following before reading ahead.
This article does show, how to:
✅ Directly deal with binary data in the browser, without the need for a dedicated input field.
✅ Put these into a format that can be streamed to a remote location with modern browser interfaces ( compatibility check at the end of the article ).
✅ Wrap the features up into a reusable Vue.js component. You can drop the resulting code into a .vue file and use it right away.
This article does not show, how to
❌ Extract the file from an <input type="file"/> - HTML tag inside a wrapping form - tag, which also includes the /post path
❌ Use a FormData object to which the file will be appended and sent to the server as a whole (even though that would also be doable)
Still on board? Then let's do this. Or jump right to the finished source code
Prerequisites
To follow along, you need to have a working version of Node.js and the Vue CLI installed on your machine, as well as a basic understanding of how Vue.js components work. The article was written using Vue 2.6.11 but it should work just as well with later versions
# Install the Vue CLI globally, in case you do not have it yet
$ npm i -g @vue/cli
Get started
As the topic is very specific, let's start with cloning this Github template repository to your local machine. It includes a basic structure created with the Vue CLI. The most relevant file will be AppFileupload.vue inside the components folder.
Move into a dedicated project folder and execute the following commands:
# Clone the repository
$ git clone https://github.com/tq-bit/vue-upload-component.git
$ cd vue-upload-component

# Install node dependencies and run the development server
$ npm install
$ npm run serve
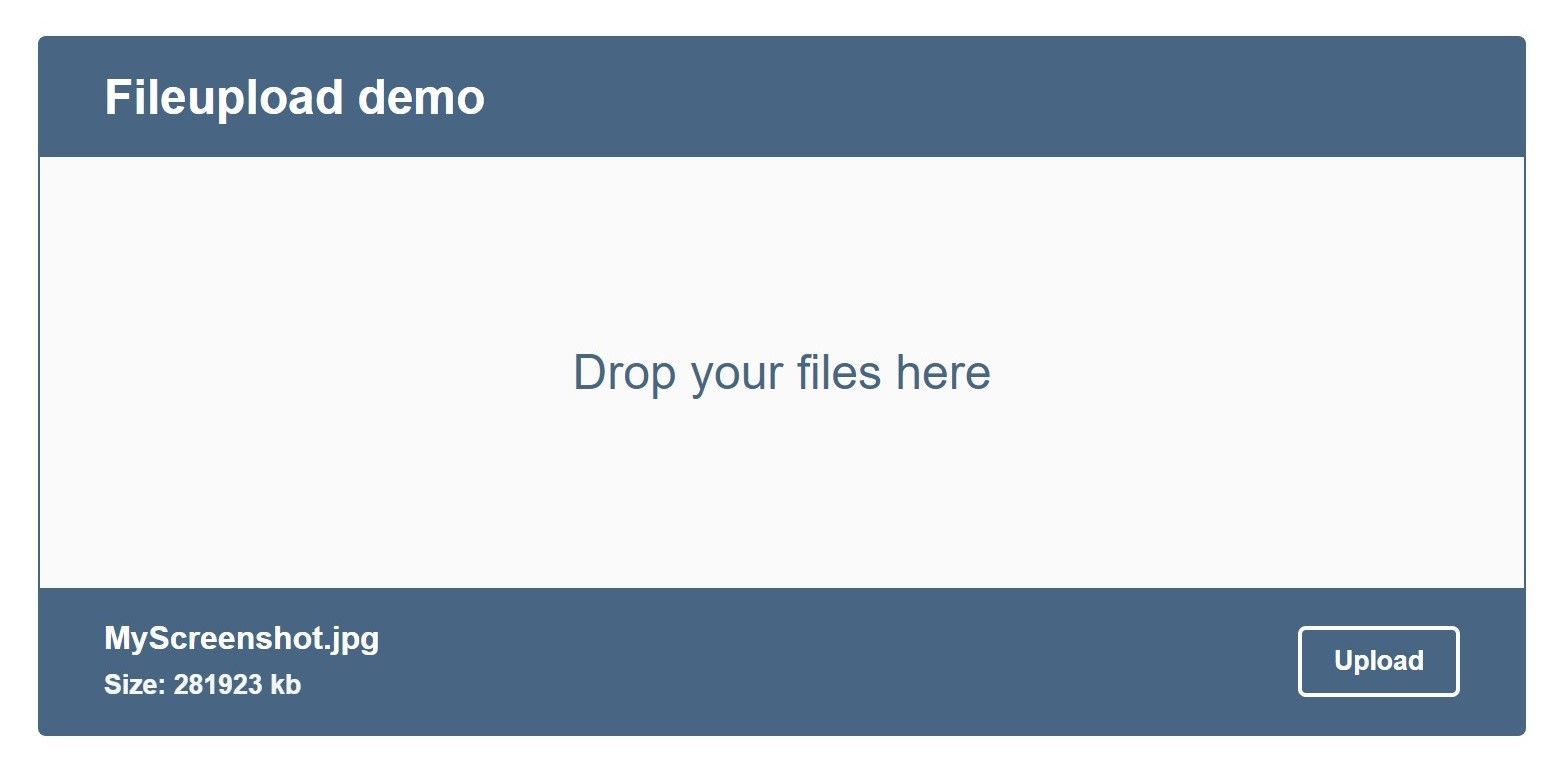
Open up your browser at http://localhost:8080 to find this template app:
While you could use a standard file-input html tag to receive files per drag & drop, using other tags requires a bit of additional work. Let's look at the relevant html - template snippet:
<div class="upload-body">
 {{ bodyText || 'Drop your files here' }}
</div>
To enable the desired functionality, we can use three browser event handlers and attach them to the upload-body. Each of them is fired by the browser as seen below:
| Event | Fires when |
|---|---|
| dragover | The left mouse button is down and hovers over the element with a file |
| drop | A file is dropped into the designated element's zone |
| dragleave | The mouse leaves the element zone again without triggering the drop event |
Vue's built-in vue-on directive makes it simple to attach functions to these events when bound to an element. Add the following directives to the template's upload-body tag:
<div
 v-on:dragover.prevent="handleDragOver"
 v-on:drop.prevent="handleDrop"
 v-on:dragleave.prevent="handleDragLeave"
 class="upload-body"
 >
 {{ bodyText || 'Drop your files here' }}
</div>
Also, within the data() - method in the <script> - part, add these two indicators that change when above events are fired. We'll use them later for binding styles and conditionally display our the footer.
<script>
data() {
  return {
   // Create a property that holds the file information
   file: {
    name: 'MyScreenshot.jpg',
    size: 281923,
   },
   // Add the drag and drop status as an object
   status: {
    over: false,
    dropped: false
   }
  };
},
</script>
Next, add the following three methods below. You could fill each of them with life to trigger other UI feedback, here, we'll focus on handleDrop.
<script>
data() {...},

methods: {
 handleDragOver() {
  this.status.over = true;
 },
 handleDrop() {
  this.status.dropped = true;
  this.status.over = false;
 },
 handleDragLeave() {
  this.status.over = false;
 }
}
</script>
Before we do, let us add two more directives to our html template to conditionally show some file metadata, and style the upload-body background.
<!-- The body will serve as our actual drag and drop zone -->
<div
 v-on:dragover.prevent="handleDragOver"
 v-on:drop.prevent="handleDrop"
 v-on:dragleave.prevent="handleDragLeave"
 class="upload-body"
 :class="{'upload-body-dragged': status.over}"
 >
 {{ bodyText || 'Drop your files here' }}
</div>

<div class="upload-footer">
 <div v-if="status.dropped">
  <!-- Display the information related to the file -->
  <p class="upload-footer-file-name">{{ file.name }}</p>
  <small class="upload-footer-file-size">Size: {{ file.size }} kb</small>
 </div>
 <button class="upload-footer-button">
  {{ footerText || 'Upload' }}
 </button>
</div>
Let's also add the necessary styles in the <style/> - section of the component to indicate when a file is hovering over the landing zone:
<style>
/* ... other classes*/
.upload-body-dragged {
 color: #fff;
 background-color: #b6d1ec;
}
</style>
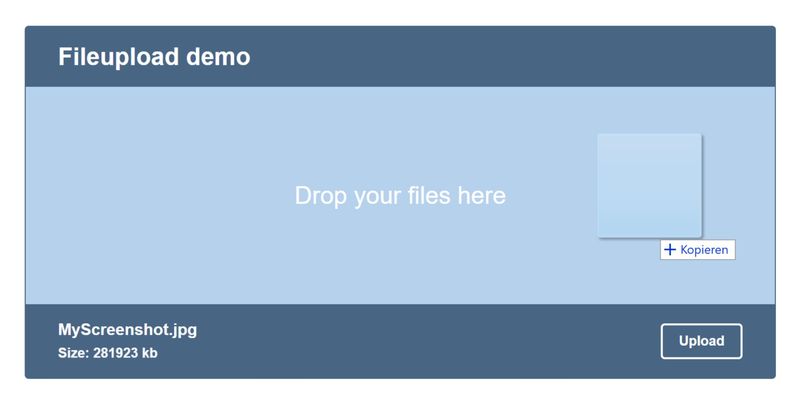
Now try and throw a file inside - you'll notice the background turns blue while the footer text appears as the events are being fired.
So far so good. Let's now dive into the handleDrop method.
Catch the dropped file and process it
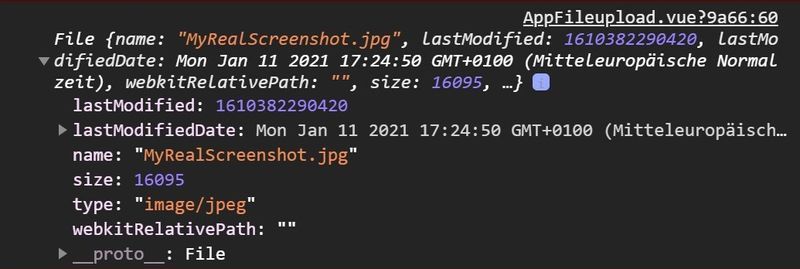
The instant you drop the file, it becomes available as a property of the browser event. We can then call upon one of its methods to assign it to a variable.
Add the following inside the handleDrop() method:
const fileItem = event.dataTransfer.items[0].getAsFile();
This is what the browser's console displays the dropped item like. We do not only get access to the file itself, but also to a few useful information about it.
That's a perfect opportunity for some user feedback! Add the following to the bottom of the handleDrop() method:
this.file = {
 name: fileItem.name,
 size: (fileItem.size / 1000).toFixed(2),
};
Finally, we can now make use of the Filereader API to catch the actual file contents and prepare it for further processing.
Please note that this process can be customized, based on your app's needs. The following procedure makes the file available as an ArrayBuffer to process the image's raw binary data.
Add the following to the bottom of the handleDrop() - method and optionally uncomment / remove unrelevant parts:
const reader = new FileReader();

// Interchange these methods depending on your needs:

// Read the file's content as text
// reader.readAsText(fileItem);

// Read the file's content as base64 encoded string, represented by a url
// reader.readAsDataURL(fileItem);

// Read the file's content as a raw binary data buffer
reader.readAsArrayBuffer(fileItem);

// Wait for the browser to finish reading and fire the onloaded-event:
reader.onloadend = event => {
 // Take the reader's result and use it for the next method
 const file = event.target.result;
 this.handleFileupload(file);
 // Emit an event to the parent component
 this.$emit('fileLoaded', this.file)
};
In a nutshell, an array buffer is the most generic type our file could take. While being performant, it might not always be the best choice. You can read more on the matter at javascript.info and this article on stackabuse.
Stream the file to a server
As stated, we will not send the file as a whole, but stream it to a receiving backend. Luckily, the browser's built in fetch API has this functionality by default.
For the purpose to test our app, I've created a node.js service on heroku that interprets whatever file is POSTed and sends back a basic response. You can find its source code here: https://github.com/tq-bit/vue-upload-server.
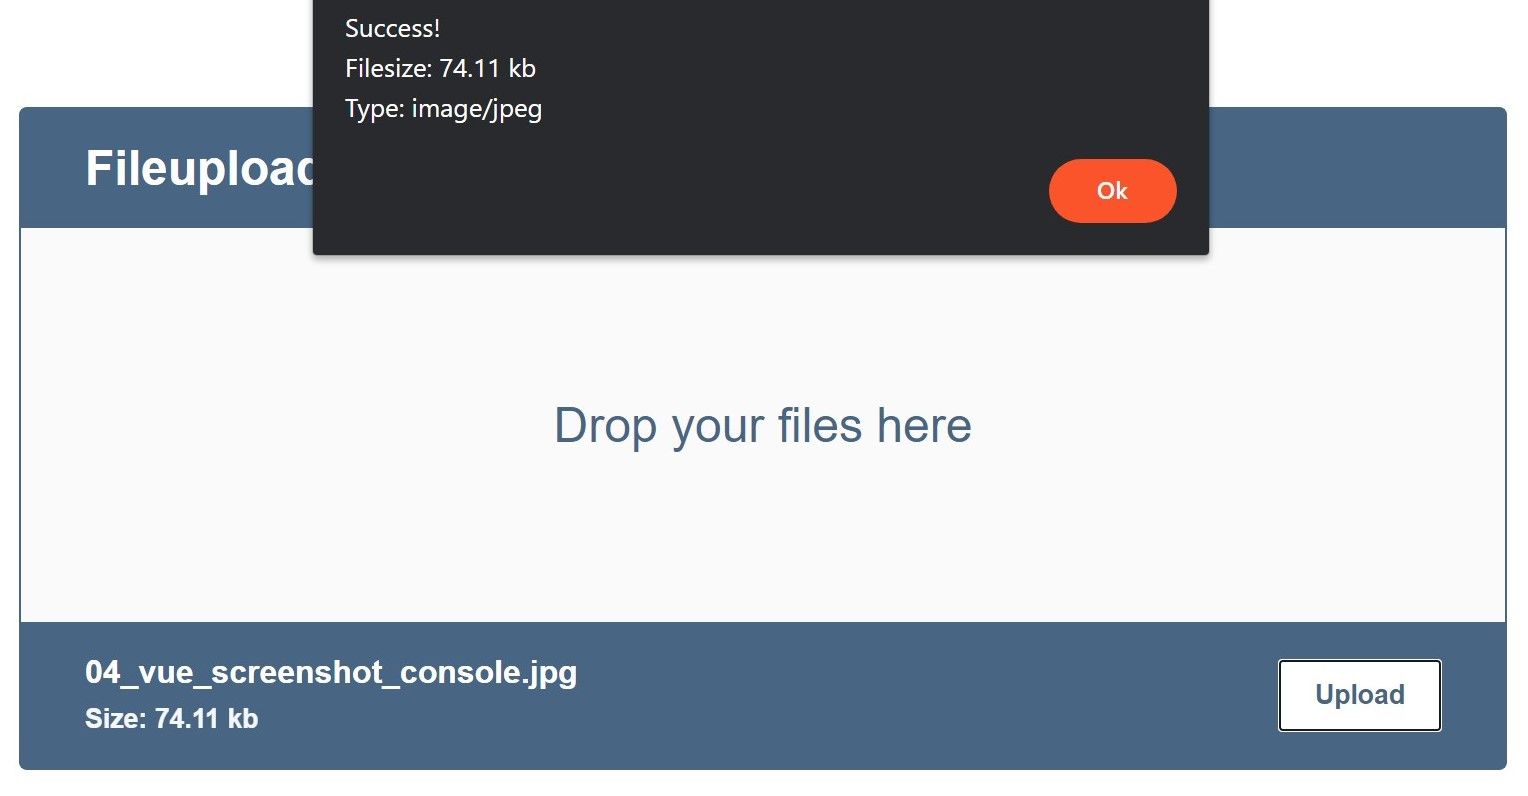
Let's use that one in our app. Add the following code as a method to your AppFileupload.vue file:
async handleFileupload() {
 const url = 'https://vue-upload-server.herokuapp.com/';
 const options = { method: 'post', body: this.file.value };
 try {
  const response = await fetch(url, options);
  const data = await response.json();
  const { bytes, type } = data;
  alert(`Filesize: ${(bytes / 1000).toFixed(2)} kb \nType: ${type.mime}`)
 } catch (e) {
  alert('Error! \nAn error occured: \n' + e);
 }
},
Now try to drop a file and hit 'Upload' - if it goes well, you'll receive a response in the form of an alert with some basic info about your file.
That's it. You've got a fully functioning upload component. And you're not bound to vue.js. How about trying to integrate the same functionality into a vanilla project? Or extend the existing template and add custom properties for headingText and bodyText?
To wrap this article up, you can find the finished Github repository below.
Happy coding
tq-bit/vue-upload-component
Contribute to tq-bit/vue-upload-component development by creating an account on GitHub.
 tq-bit
Bonus: Add a svg loader
Since communication can take a moment, before wrapping up, let us add a loading indicator to our app. The svg I am using comes from loading.io, a website that, besides paid loaders, also provides free svg loaders.
In the template part of your component, replace the upload-body - div with the following:
<div
 v-on:dragover.prevent="handleDragOver"
 v-on:drop.prevent="handleDrop"
 v-on:dragleave.prevent="handleDragLeave"
 class="upload-body"
 :class="{ 'upload-body-dragged': status.over }"
>
 <svg
  v-if="loading"
  xmlns="http://www.w3.org/2000/svg"
  xmlns:xlink="http://www.w3.org/1999/xlink"
  style="margin: auto; display: block; shape-rendering: auto; animation-play-state: running; animation-delay: 0s;"
  width="160px"
  height="105px"
  viewBox="0 0 100 100"
  preserveAspectRatio="xMidYMid"
  >
   <path
    fill="none"
	stroke="#486684"
	stroke-width="8"
	stroke-dasharray="42.76482137044271 42.76482137044271"
	d="M24.3 30C11.4 30 5 43.3 5 50s6.4 20 19.3 20c19.3 0 32.1-40 51.4-40 C88.6 30 95 43.3 95 50s-6.4 20-19.3 20C56.4 70 43.6 30 24.3 30z"
	stroke-linecap="round"
	style="transform: scale(0.8); transform-origin: 50px 50px; animation-play-state: running; animation-delay: 0s;"
	>
    <animate
     attributeName="stroke-dashoffset"
     repeatCount="indefinite"
     dur="1s"
     keyTimes="0;1"
     values="0;256.58892822265625"
     style="animation-play-state: running; animation-delay: 0s;"
     ></animate>
  </path>
 </svg>
 <span v-else>{{ bodyText || 'Drop your files here' }}</span>
</div>
Also, add the following on top of your data () - function:
data() {
 return {
  loading: false,
  /* ... other data props ... */
 };
},
Now, when you upload a file, you should notice the loader to appear instead of the text.
